
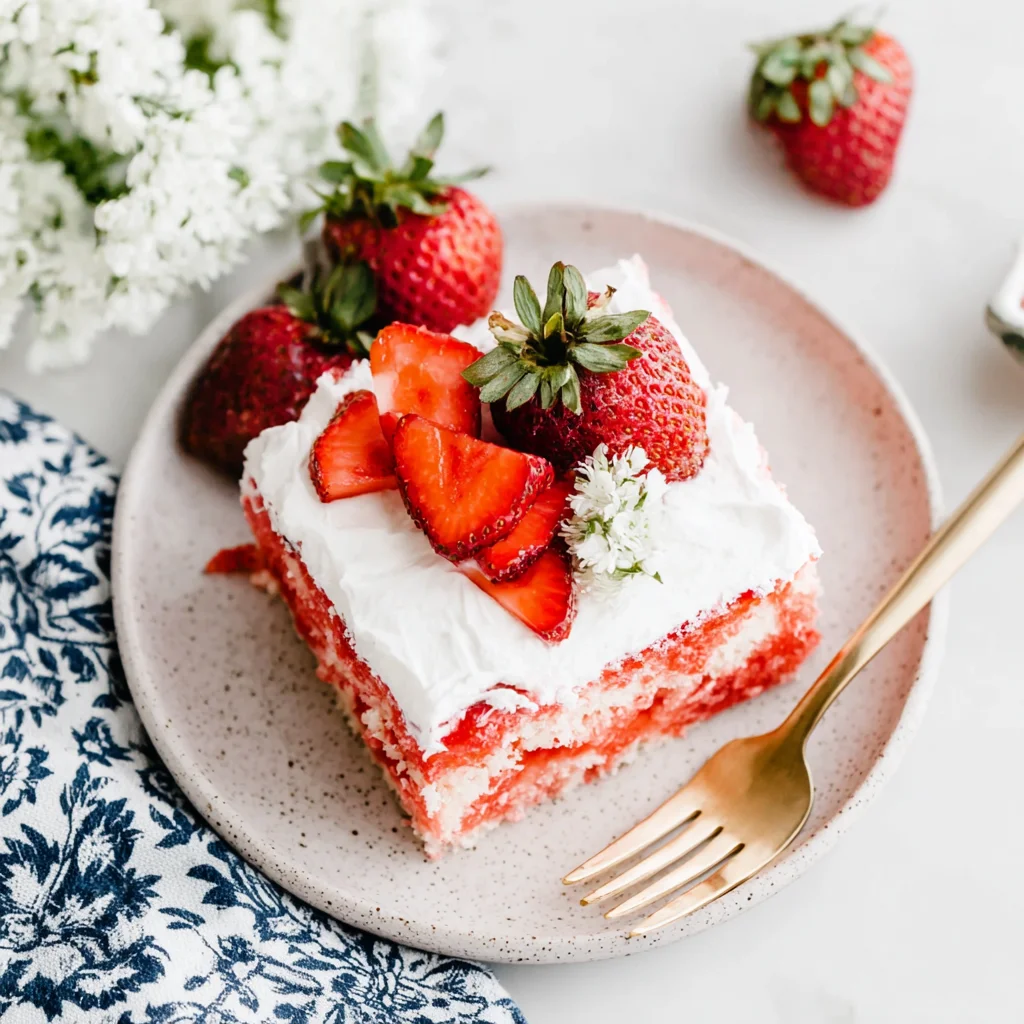
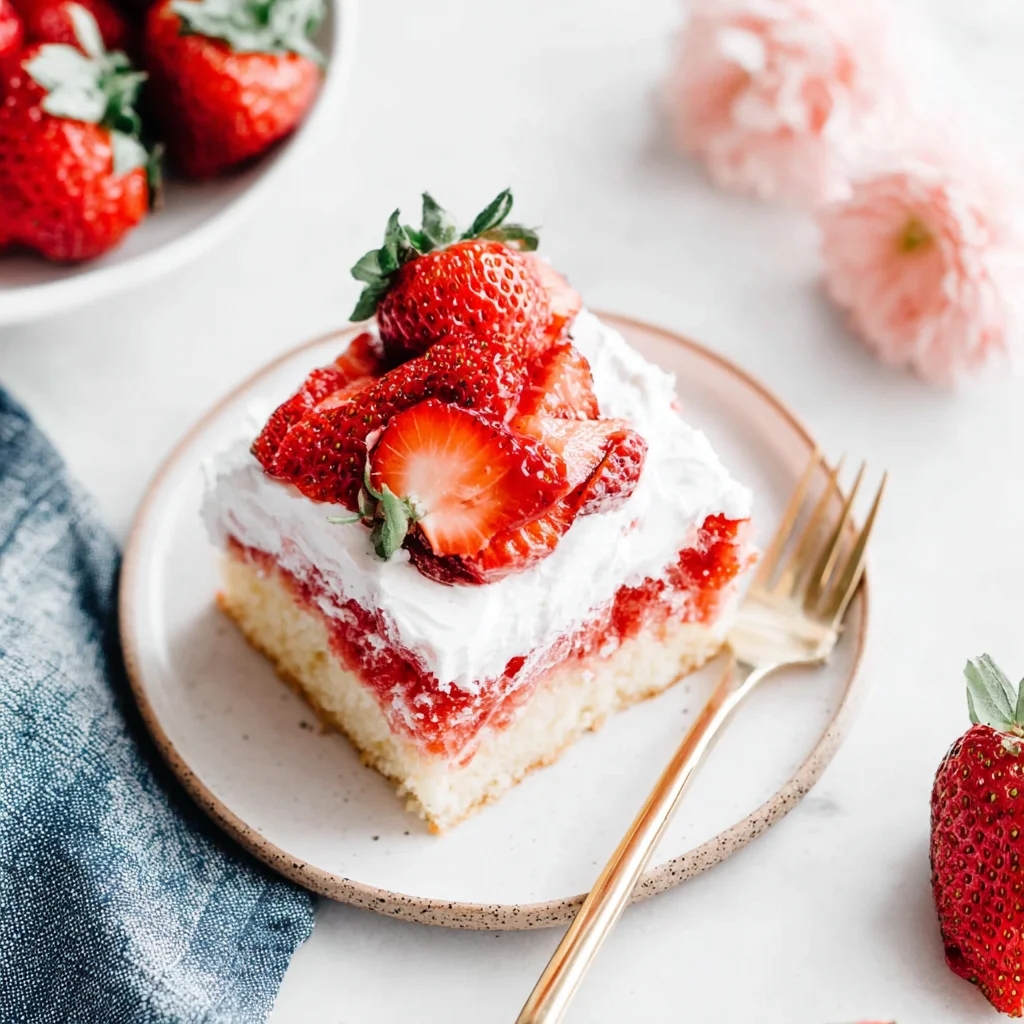
Strawberry Poke Cake The Perfect Dessert
This delightful Strawberry Poke Cake is a true celebration of fresh berry flavor and tender cake. A moist yellow or white cake is infused with sweet strawberry gelatin, then crowned with a vibrant homemade strawberry topping and a cloud of whipped cream, finished with fresh strawberries. It's a show-stopping, refreshing dessert perfect for any occasion, promising a burst of summer in every bite.
Prep Time
25 minutes
Cook Time
30-35 minutes
Total Time
4 hours (includes chilling time)
Servings
12-15 servings
Keywords

Why This Recipe Delivers
- Bursting with Fresh Flavor: Infused with strawberry jello and topped with homemade strawberry sauce.
- Incredibly Moist Texture: The gelatin keeps the cake wonderfully moist and tender.
- Easy to Make: Uses a convenient cake mix base, simplifying the baking process.
- Visually Stunning: Layers of white cake, red jello, strawberry topping, and whipped cream create a beautiful presentation.
- Perfect for Crowds: A 9×13 inch pan yields generous servings, ideal for parties and gatherings.
Ingredients
- 1 box (approximately 432 g or 15.25 oz) yellow or white cake mix, plus ingredients as per package directions (typically eggs, oil, water)
- 1 box (approximately 85 g or 3 oz) strawberry gelatin mix
- 283 g (10 oz) frozen whipped topping, thawed (e.g., Cool Whip)
- 1 pint (approximately 340-450 g) fresh strawberries, for garnish
- For the Strawberry Topping:
- 230 g (1 cup) fresh or frozen strawberries, hulled and quartered if large
- 100 g (1/2 cup) granulated sugar
- 15 ml (1 tablespoon) fresh lemon juice
Instructions
- Preheat your oven to 175°C (350°F). Lightly grease and flour a 23×33 cm (9×13 inch) baking pan, or spray generously with a non-stick cooking spray to ensure the cake releases easily.
- In a large mixing bowl, prepare the yellow or white cake mix according to the package directions, using the specified amounts of eggs, oil, and water. Mix until just combined, being careful not to overmix, as this can lead to a tough cake.
- Carefully pour the prepared cake batter evenly into the greased 23×33 cm (9×13 inch) baking pan. Place the pan into the preheated oven and bake for 30-35 minutes, or until a wooden skewer or toothpick inserted into the center of the cake comes out clean.
- While the cake bakes, begin preparing the vibrant strawberry dessert topping. In a medium saucepan, combine the 230 g (1 cup) fresh or frozen strawberries, 100 g (1/2 cup) granulated sugar, and 15 ml (1 tablespoon) fresh lemon juice.
- Place the saucepan over medium heat. Bring the mixture to a gentle simmer, stirring occasionally. Cook for approximately 6-10 minutes, or until the strawberries have softened and the liquid has thickened to a syrupy consistency. If using frozen fruit, it may take a little longer to thicken as more water needs to evaporate.
- To test for readiness, dip a spoon into the strawberry topping; if it coats the back of the spoon, it's ready. Carefully pour the hot strawberry topping into a heat-proof bowl and set it aside to cool completely. Use a kitchen glove or oven mitt when handling the hot pan to prevent burns.
- Once the cake is baked, remove it from the oven and place it on a wire cooling rack. Allow the cake to cool in the pan for about 15 minutes. During this time, the cake will firm up slightly, making it easier to handle.
- While the cake is cooling, prepare the strawberry gelatin. In a separate heat-proof bowl, pour boiling water (following the specific measurements written on your gelatin mix package) over the strawberry gelatin powder. Stir thoroughly until all the gelatin powder has completely dissolved, ensuring there are no granular bits remaining. Transfer the dissolved gelatin into a jar or a liquid measuring cup with a spout for easy pouring. Let it cool slightly before proceeding.
- Wash and hull the remaining 1 pint of fresh strawberries. Slice them vertically into uniform pieces. These beautiful slices will be used later to garnish the top of the finished cake, adding a touch of freshness and visual appeal.
- After the cake has cooled for 15 minutes, use the handle of a wooden spoon or a similar blunt instrument to poke holes all over the surface of the cake. Aim for fairly even lines and spacing, poking deep enough to reach the bottom of the cake without tearing it excessively. These holes are crucial for the gelatin to seep into, creating the characteristic "poke cake" texture.
- Carefully and evenly pour the slightly cooled, but still liquid, strawberry gelatin over the entire poked cake, making sure to distribute it well into all the holes you created. Allow the cake to sit at room temperature for a short while, allowing the gelatin to fully penetrate the cake.
- Once the gelatin has set slightly into the cake, spread the cooled strawberry dessert topping evenly over the entire surface of the cake. Gently smooth it out with an offset spatula or the back of a spoon. Allow it to cool for a bit longer.
- Thirteenth Step: When both the cake and toppings are completely cool, gently spread the thawed whipped topping evenly over the strawberry topping layer. You can create decorative swirls or simply smooth it out for a clean finish.
- Fourteenth Step: Arrange the vertically sliced fresh strawberries on top of the whipped topping layer. You can design the strawberries in any pattern you desire, such as rows, a central design, or scattered artfully.
- Fifteenth Step: Place the finished Strawberry Poke Cake in the refrigerator for a minimum of 3 hours to allow the gelatin to fully set, the flavors to meld, and the cake to become perfectly chilled. This step is essential for the best texture and taste.
- Sixteenth Step: Once thoroughly chilled, slice the cake into desired portions and serve immediately. Enjoy this delightful and refreshing strawberry-infused dessert!
Tools You’ll Need
- 9×13 inch (23×33 cm) baking pan
- Large mixing bowl
- Medium saucepan
- Wire cooling rack
- Whisk or electric mixer
- Measuring cups and spoons (or kitchen scale)
- Spatula or offset spatula
- Wooden spoon or similar for poking holes
- Heat-proof bowls
- Liquid measuring cup or jar with a spout
- Sharp knife for slicing strawberries
Essential Success Tips
- Do not overmix the cake batter; mix only until just combined to ensure a tender cake.
- Ensure the cake has cooled for at least 15 minutes before poking holes and pouring the gelatin, to prevent it from collapsing.
- Allow the gelatin to cool slightly before pouring it over the cake; it should still be liquid but not piping hot, which could melt the cake.
- Chill the cake for the recommended 3 hours; this is crucial for the gelatin to set properly and for the flavors to fully meld.
- When making the strawberry topping, cook until it visibly coats the back of a spoon for the ideal consistency.
Professional Cooking Secrets
- For an extra layer of flavor and aroma, add a teaspoon of vanilla extract or a few drops of almond extract to the cake batter.
- To achieve a more intense strawberry flavor in your homemade topping, gently mash a portion of the cooked strawberries before the mixture fully thickens.
- For a truly ethereal whipped topping, consider making your own fresh whipped cream by whipping heavy cream with a touch of powdered sugar and vanilla until stiff peaks form.
Notes
- Storage: Store any leftover Strawberry Poke Cake in an airtight container in the refrigerator for up to 3-4 days.
- Variation: For a different flavor profile, try using a white cake mix with raspberry or cherry gelatin and corresponding fruit.
- Make Ahead: This cake is excellent made a day in advance, as it allows the flavors to deepen and the gelatin to fully infuse the cake.
Frequently Asked Questions
Can I use fresh whipped cream instead of Cool Whip?
Absolutely! Freshly whipped cream is a delicious alternative. Just be sure to whip heavy cream with a bit of powdered sugar and vanilla until stiff peaks form, then spread it over the cooled cake.
My cake didn't absorb all the jello. What went wrong?
This could happen if the holes weren't poked deep enough or were not numerous enough. Ensure you poke holes deep into the cake, reaching almost to the bottom, and make them fairly close together to allow the gelatin to thoroughly saturate the cake.
Can I use a different flavor of jello?
Yes, you can certainly experiment with other gelatin flavors! Raspberry, cherry, or even orange gelatin would create a delightful variation, especially if paired with corresponding fruit toppings.
Nutrition Facts (Per Serving)
Approximately 350-400 calories, 5g protein, 15-20g fat, 50-60g carbohydrates per serving (based on 12 servings).
Allergy Information
Contains dairy (Cool Whip, if it contains milk derivatives) and gluten (cake mix). For a gluten-free version, use a certified gluten-free yellow or white cake mix. Always check package labels for specific allergen information.


No comment