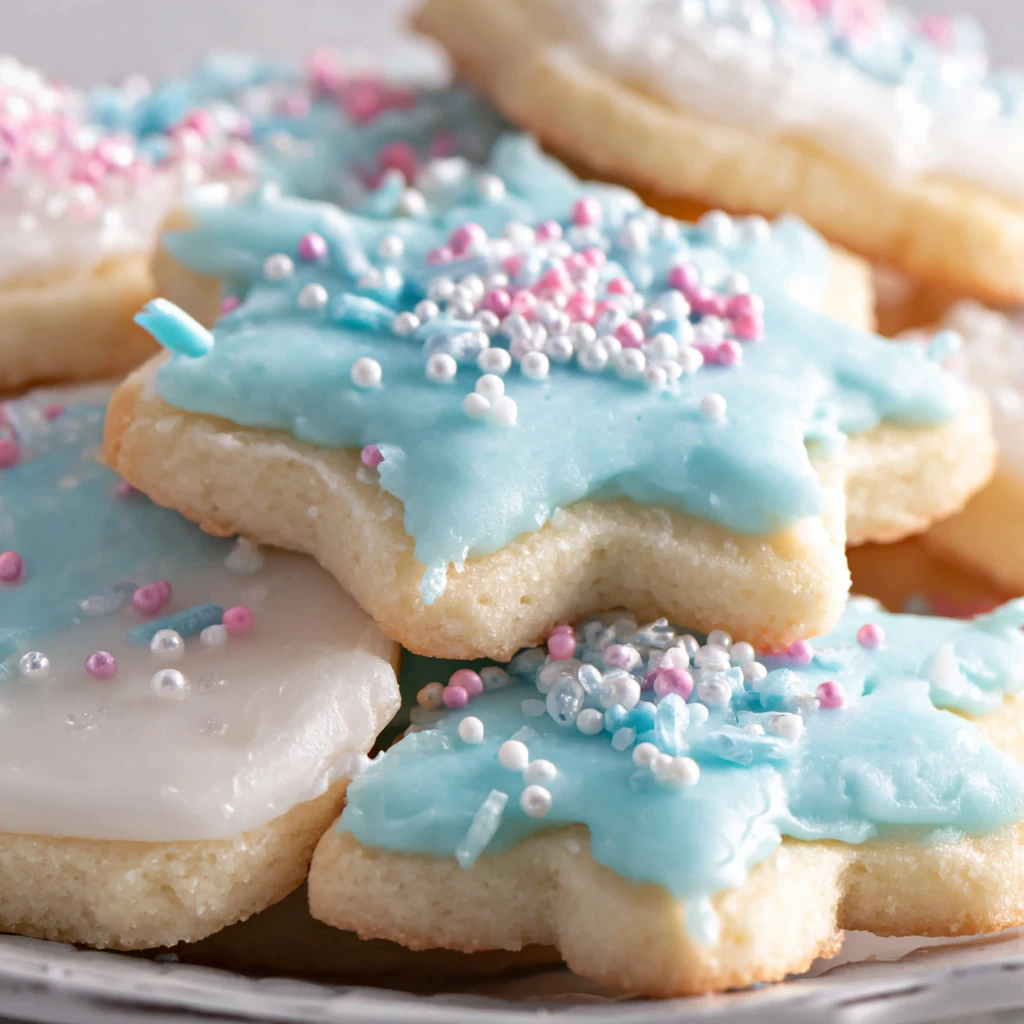
Decorative Sugar Cookie Icing Recipe – Easy & Beautiful
Elevate your sugar cookie game with this incredibly easy and beautiful decorative icing recipe. Achieve a professional, smooth finish that's perfect for any occasion, from festive holidays to elegant celebrations. This versatile recipe allows for vibrant coloring and precise detailing, transforming simple cookies into edible works of art.
Prep Time
15 minutes
Cook Time
0 minutes
Total Time
15 minutes
Servings
Enough for approximately 2-3 dozen standard sugar cookies
Keywords

Why This Recipe Delivers
- Achieves a beautiful, professional, and smooth finish on sugar cookies.
- The inclusion of corn syrup ensures a flexible icing that resists cracking.
- Easy to adjust consistency for both outlining and flooding techniques.
- Transforms simple cookies into stunning edible art with minimal effort.
- Perfect for beginners and experienced decorators alike, offering reliable results.
Ingredients
- 360g (3 cups) powdered sugar, sifted
- 60ml (4 tablespoons) full-fat milk
- 22.5ml (1 1/2 tablespoons) light corn syrup
- 2.5ml (1/2 teaspoon) pure vanilla extract
- A pinch of salt
- Optional gel food coloring
- Plain, cooled sugar cookies, for decorating
Instructions
- In a medium mixing bowl, carefully sift 360g (3 cups) of powdered sugar. Add a pinch of salt to the sifted sugar. Sifting is a crucial step that removes any lumps from the powdered sugar, ensuring your final icing is silky smooth and free of gritty texture, which is essential for elegant cookie decoration.
- In a separate small bowl, whisk together 60ml (4 tablespoons) of full-fat milk, 22.5ml (1 1/2 tablespoons) of light corn syrup, and 2.5ml (1/2 teaspoon) of pure vanilla extract until thoroughly combined. The light corn syrup is a key ingredient here; it not only adds a beautiful sheen to the dried icing but also provides a desirable flexibility, preventing cracking and chipping as the cookies are handled.
- Gradually add the wet ingredients from the small bowl to the sifted powdered sugar mixture in the medium bowl. Begin by adding about half of the liquid, stirring with a whisk or spatula until a thick, somewhat crumbly paste forms. Continue adding the remaining liquid a tablespoon at a time, stirring thoroughly after each addition until a smooth, uniform, and lump-free icing is achieved. The initial thickness should resemble toothpaste for outlining.
- Master the consistency for your decorating needs. For a thinner icing, ideal for 'flooding' (filling in outlined areas), add milk a quarter teaspoon at a time, stirring well after each addition, until the icing flows smoothly but not too quickly off a spoon. For a thicker icing, perfect for fine piping details or creating a sturdy outline, add sifted powdered sugar a tablespoon at a time, mixing until the desired firmness is reached.
- If you wish to create a vibrant palette, divide the basic icing into separate small bowls. Add gel food coloring sparingly, using a toothpick to introduce a tiny amount, then mix until the desired shade is reached. Gel food coloring is highly recommended over liquid food coloring as it provides intense color without significantly altering the icing's consistency.
- Prepare your decorating tools. Spoon the thicker outlining icing into a piping bag fitted with a small round tip. Carefully outline your cooled sugar cookies, creating a barrier for the flooding icing. Allow this outline to set for approximately 5-10 minutes. Then, using a separate piping bag with a slightly larger tip or a squeeze bottle, fill the outlined areas with the thinner flooding icing. Use a clean toothpick or a scribe tool to gently spread the flooding icing to the edges and pop any air bubbles for a perfectly smooth surface.
- Patience is paramount for beautiful results. Allow your magnificently decorated cookies to dry completely on a flat surface, such as a baking sheet or wire rack, for several hours or, ideally, overnight. The icing should be firm and non-tacky to the touch before stacking or packaging to prevent smudging.

Tools You’ll Need
- Medium mixing bowl
- Small separate bowl
- Whisk or spatula
- Fine-mesh sieve
- Measuring cups and spoons
- Piping bags
- Small round piping tips (e.g., PME #1, Wilton #2)
- Toothpicks or scribe tool
- A flat surface or wire rack for drying
Essential Success Tips
- Always sift your powdered sugar: This is the most important step for a smooth, lump-free icing. Don't skip it!
- Adjust liquid gradually: When adding milk to achieve the right consistency, do so in very small increments. It's easier to add more liquid than to thicken thin icing.
- Use gel food coloring: Liquid food coloring can thin your icing too much. Gel colors provide vibrant hues without altering consistency.
- Outline and flood in stages: Allowing the outline to set slightly before flooding prevents the colors from bleeding together and creates a crisp edge.
- Ensure cookies are completely cool: Decorating warm cookies will cause the icing to melt or run, ruining your design.
Professional Cooking Secrets
- Achieve '10-second' consistency for flooding: When you drizzle a spoonful of flooding icing back into the bowl, it should take about 10 seconds for the line to disappear back into the surface. This indicates perfect flow for smooth filling.
- Prevent color bleeding in humid environments: Add a tiny amount of cream of tartar (1/8 teaspoon per batch) to the powdered sugar before sifting. This can help stabilize the icing and reduce bleeding, especially in high humidity.
- Store unused icing properly: Store any leftover icing in an airtight container with plastic wrap pressed directly onto the surface to prevent a crust from forming. It can be refrigerated for up to two weeks; re-whisk before use.

Notes
- Storage: Once decorated, store cookies in an airtight container at room temperature for up to 1-2 weeks. For best results, allow icing to fully cure for 24 hours before stacking.
- Variations: Experiment with different flavor extracts beyond vanilla, such as almond, lemon, or peppermint, to complement your cookie flavors.
- Drying hack: To speed up drying, place decorated cookies in front of a fan on a low setting for 1-2 hours, or in a dehydrator at its lowest temperature (around 35-40°C or 95-105°F) for 30-60 minutes.
Frequently Asked Questions
Can I use different types of milk?
Full-fat milk is recommended for the richest consistency and best results, but 2% milk can also work. Skim milk might make the icing slightly thinner, so you may need to adjust with a bit more powdered sugar.
What if my icing is too thick or too thin?
If it's too thick, add milk a quarter teaspoon at a time until the desired consistency is reached. If it's too thin, add sifted powdered sugar a tablespoon at a time until it thickens sufficiently.
How long does the decorated icing take to dry completely?
The drying time can vary based on humidity and icing thickness, but generally, it takes 6-8 hours, or ideally overnight (12-24 hours), for the icing to fully harden and cure.
Nutrition Facts (Per Serving)
Per 1 tablespoon serving (approximate, without cookies): Calories: 50, Total Fat: 0g, Saturated Fat: 0g, Cholesterol: 0mg, Sodium: 5mg, Total Carbohydrates: 13g, Sugars: 13g, Protein: 0g.
Allergy Information
Contains dairy (milk). This recipe is naturally gluten-free if using gluten-free powdered sugar (check label) and decorating gluten-free cookies. Always verify ingredients if allergies are a concern.


No comment