Honey Mustard Chicken Sliders: The Ultimate Recipe Guide
Indulge in the perfect harmony of crispy, tender chicken and tangy-sweet honey mustard sauce, all nestled in a soft slider bun. These Honey Mustard Chicken Sliders are an absolute crowd-pleaser, ideal for parties, game nights, or a delightful family meal. They deliver a burst of flavor in every bite, promising a delicious experience that's both satisfying and easy to prepare.
Prep Time
30 minutes
Cook Time
35-40 minutes
Total Time
1 hour 5 minutes (active), plus 10-15 minutes resting time and optional 30 minutes sauce chilling time
Servings
Makes 12 delicious sliders
Keywords
Why This Recipe Delivers
- Unbeatably crispy chicken with a juicy interior.
- Homemade honey mustard sauce that's perfectly balanced between sweet and tangy.
- Ideal for entertaining, making them a crowd-pleasing party snack or easy family meal.
- Customizable with your favorite toppings to suit any palate.
- A fun and flavorful twist on classic fried chicken, perfect for small bites.
Ingredients
- 900 g (2 lbs) boneless, skinless chicken breasts
- 60 g (1/2 cup) all-purpose flour
- 5 mL (1 teaspoon) paprika
- 2.5 mL (1/2 teaspoon) garlic powder
- 2.5 mL (1/2 teaspoon) onion powder
- 1.25 mL (1/4 teaspoon) cayenne pepper (optional, for a little kick)
- 2.5 mL (1/2 teaspoon) salt
- 1.25 mL (1/4 teaspoon) black pepper
- 2 large eggs, beaten
- 100 g (1 cup) panko breadcrumbs
- 120 mL (1/2 cup) vegetable oil, for frying (plus more if needed)
- For the Honey Mustard Sauce:
- 120 mL (1/2 cup) mayonnaise
- 60 mL (1/4 cup) Dijon mustard
- 60 mL (1/4 cup) honey
- 15 mL (1 tablespoon) apple cider vinegar
- 2.5 mL (1/2 teaspoon) garlic powder
- 1.25 mL (1/4 teaspoon) salt
- 1.25 mL (1/4 teaspoon) black pepper
- For Assembly:
- 12 slider buns
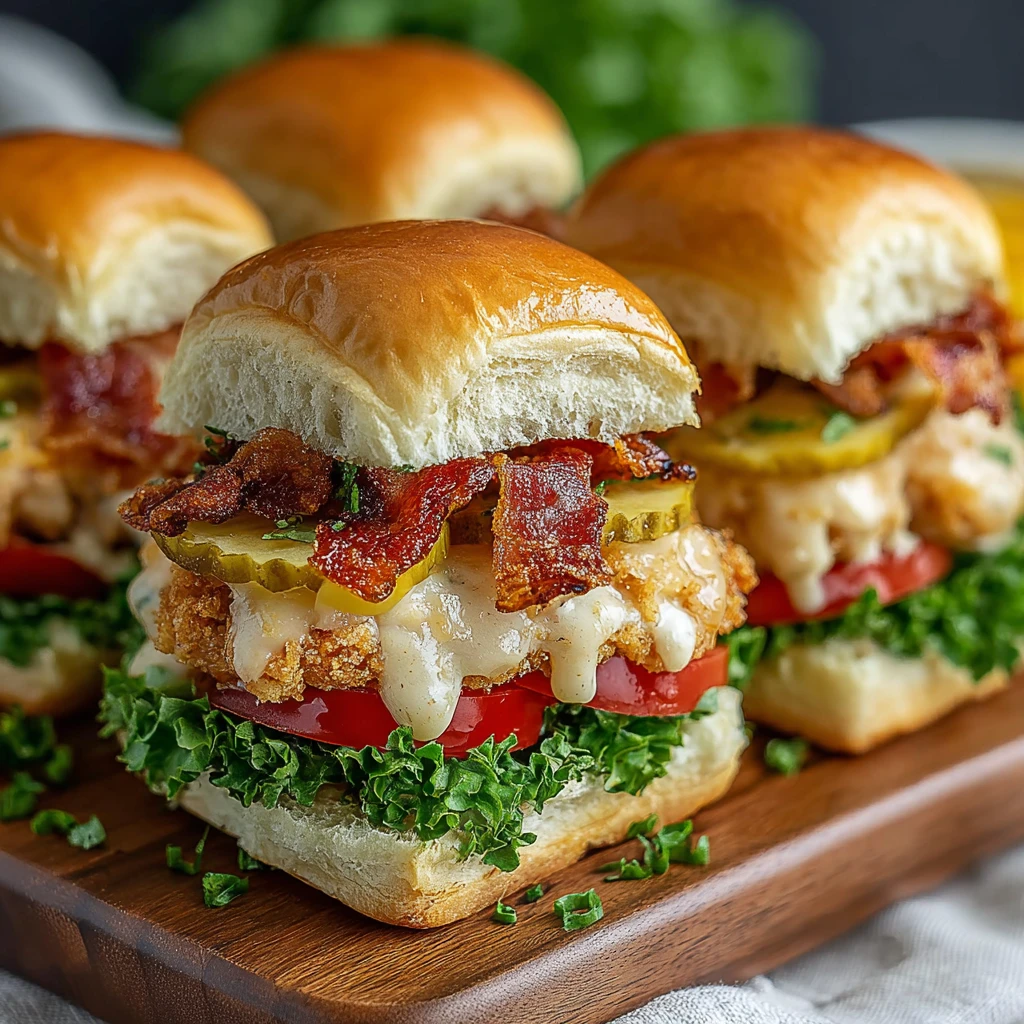
- 4 slices cheddar cheese, quartered (yielding 16 small squares)
- Fresh lettuce leaves, for topping (optional)
- Sliced ripe tomatoes, for topping (optional)
- Crisp pickle chips, for topping (optional)
Instructions
- Prepare the Chicken Pieces: Carefully trim any excess fat from the chicken breasts. Then, using a sharp knife, slice the chicken into slider-sized portions, aiming for pieces approximately 5-7.5 cm (2-3 inches) square and about 1.25 cm (1/2 inch) thick. If breasts are very thick, butterfly them horizontally to achieve a consistent thickness, which ensures even cooking.
- Set up the Breading Station: Arrange three shallow dishes or plates for your breading process. In the first dish, thoroughly combine the 60 g (1/2 cup) all-purpose flour, 5 mL (1 teaspoon) paprika, 2.5 mL (1/2 teaspoon) garlic powder, 2.5 mL (1/2 teaspoon) onion powder, 1.25 mL (1/4 teaspoon) cayenne pepper (if using for a subtle heat), 2.5 mL (1/2 teaspoon) salt, and 1.25 mL (1/4 teaspoon) black pepper. In the second dish, lightly beat the 2 large eggs. In the third dish, spread out the 100 g (1 cup) panko breadcrumbs.
- Bread the Chicken: Take each chicken piece and first dredge it completely in the seasoned flour mixture, shaking off any excess. Next, dip it into the beaten eggs, ensuring it's fully coated. Finally, press the chicken gently into the panko breadcrumbs, coating all sides thoroughly. The panko will give the chicken its signature crunch. Place the breaded chicken pieces on a clean plate or baking sheet as you go.
- Rest the Breaded Chicken: Allow the breaded chicken to rest undisturbed for 10-15 minutes at room temperature. This crucial step helps the breading adhere better to the chicken, preventing it from falling off during frying and ensuring a crispier crust.
- Heat the Oil: In a large, heavy-bottomed skillet or cast-iron pan, pour about 60-120 mL (1/4 to 1/2 inch deep) of vegetable oil. Place the skillet over medium-high heat. To test if the oil is ready, drop a tiny pinch of breadcrumbs into the pan; it should immediately sizzle vigorously and turn golden brown within a few seconds. Do not let the oil smoke.
- Fry the Chicken: Carefully and gently place the breaded chicken pieces into the hot oil. Be mindful not to overcrowd the skillet, as this can lower the oil temperature and lead to soggy chicken. Fry the chicken in batches if necessary, cooking for approximately 3-4 minutes per side, or until each piece is beautifully golden brown and the internal temperature reaches 74°C (165°F) when checked with a meat thermometer.
- Remove and Drain: Using a slotted spoon or tongs, carefully remove the cooked chicken from the skillet. Transfer the crispy chicken pieces to a wire rack that has been lined with paper towels underneath. This setup allows excess oil to drain away, keeping the chicken wonderfully crisp.
- Prepare the Honey Mustard Sauce: While the chicken rests, prepare the vibrant honey mustard sauce. In a medium-sized bowl, whisk together 120 mL (1/2 cup) mayonnaise, 60 mL (1/4 cup) Dijon mustard, 60 mL (1/4 cup) honey, 15 mL (1 tablespoon) apple cider vinegar, 2.5 mL (1/2 teaspoon) garlic powder, 1.25 mL (1/4 teaspoon) salt, and 1.25 mL (1/4 teaspoon) black pepper until the mixture is perfectly smooth and creamy.
- Adjust to Taste: Taste the honey mustard sauce and adjust the seasonings as desired. If you prefer a sweeter profile, add a little more honey. For a tangier kick, incorporate additional apple cider vinegar. This sauce should strike a delightful balance between sweet and savory.
- Chill (Optional): For the best flavor development, cover the bowl of honey mustard sauce and refrigerate it for at least 30 minutes. This allows the ingredients to meld beautifully, intensifying the taste.
- Prepare the Buns: If desired, lightly toast the slider buns in a dry skillet, toaster oven, or under a broiler for a minute or two until golden brown. This adds a lovely texture and prevents the buns from becoming soggy.
- Assemble the Sliders: Spread a generous amount of the prepared honey mustard sauce on both the top and bottom halves of each slider bun.
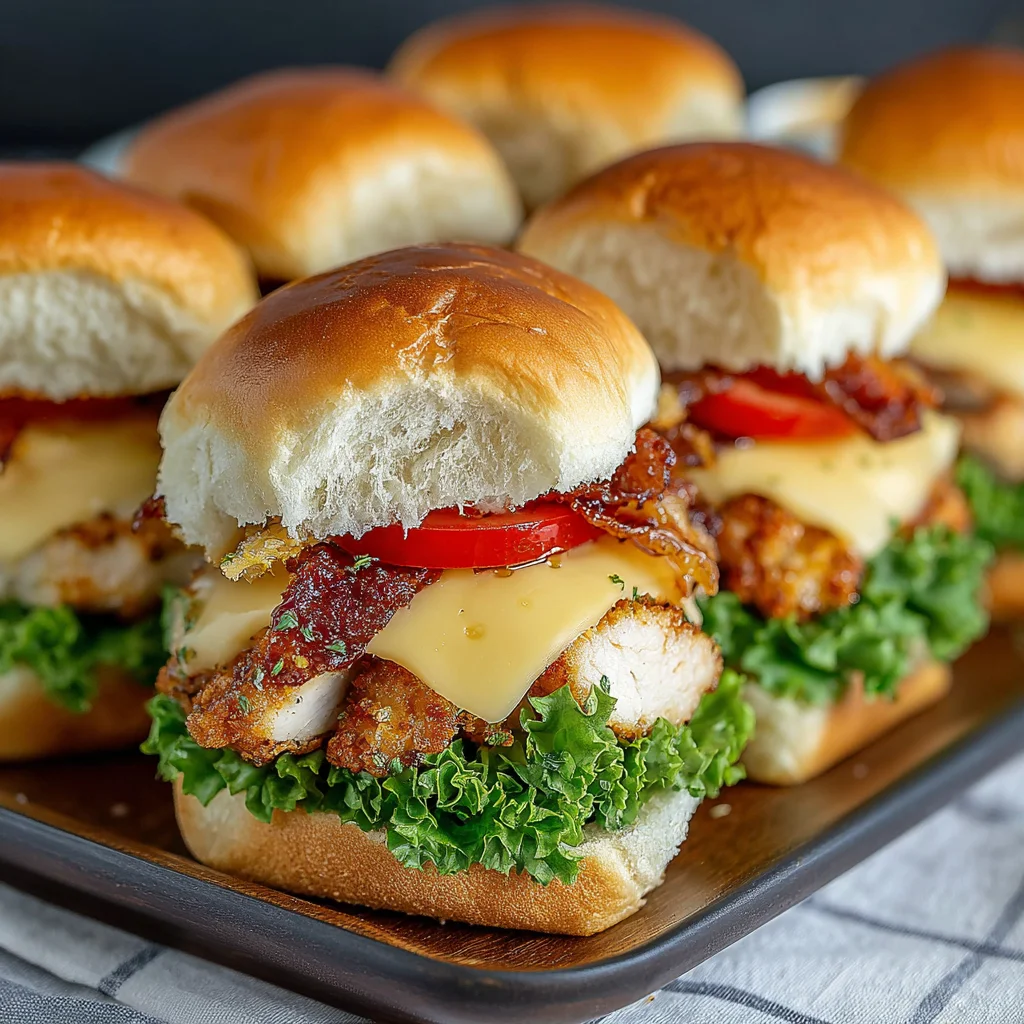
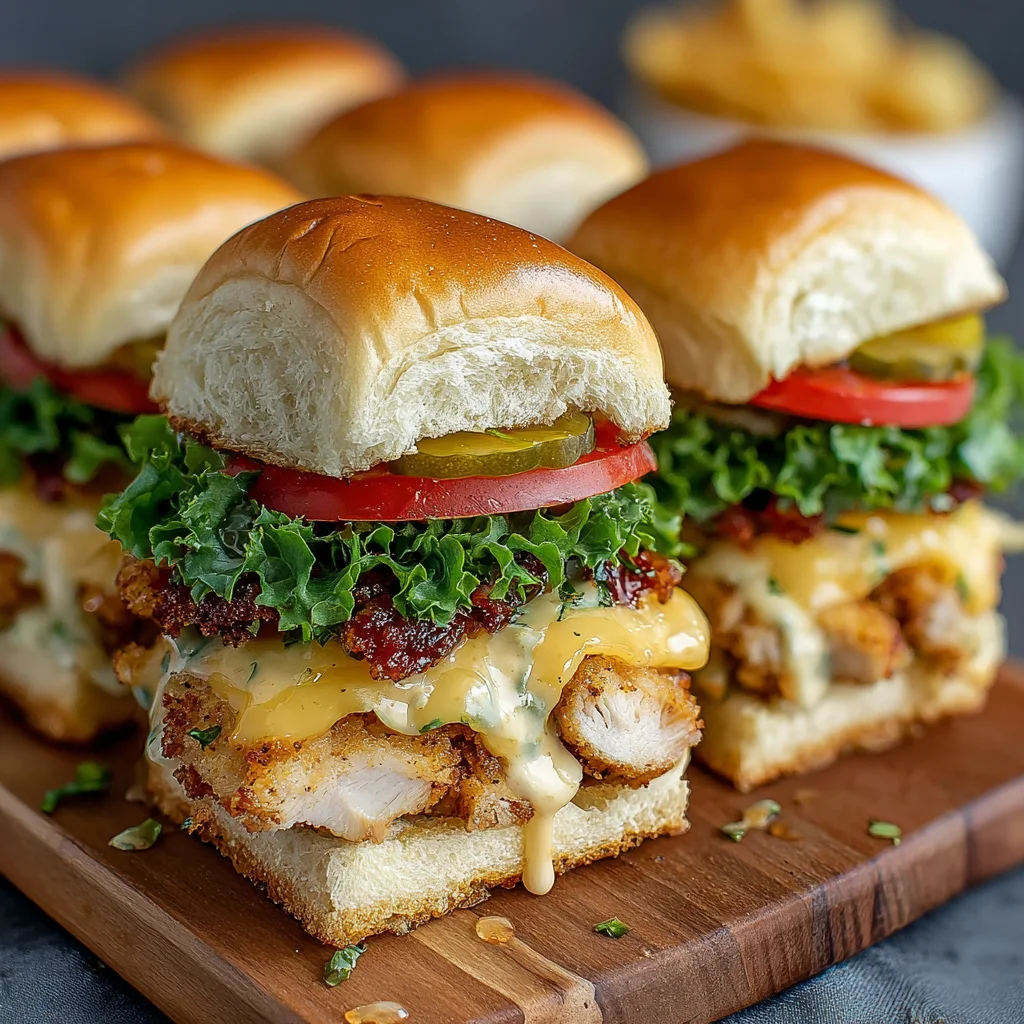
- Thirteenth Step: Add the Chicken and Cheese: Place one piece of the warm, crispy fried chicken onto the bottom half of each sauced bun. If using, immediately top each chicken piece with a quarter slice of cheddar cheese. The residual heat from the chicken will gently melt the cheese, creating a gooey layer.
- Fourteenth Step: Add Toppings: Layer your desired optional toppings onto the chicken and cheese. This could include fresh lettuce leaves for crunch, thin slices of ripe tomato for freshness, and crisp pickle chips for an added tangy zest.
- Fifteenth Step: Serve Immediately: Crown each slider with its top bun and serve them straight away. These Honey Mustard Chicken Sliders are best enjoyed hot and fresh, while the chicken is at its crispiest.
Tools You’ll Need
- Large sharp knife
- Cutting board
- Three shallow dishes or plates (for breading)
- Large skillet (preferably heavy-bottomed or cast iron)
- Tongs or slotted spoon
- Wire rack with paper towels
- Medium mixing bowl
- Whisk
- Meat thermometer (optional but recommended for accuracy)
Essential Success Tips
- Ensure uniform chicken thickness for even cooking. Butterfly thicker pieces to about 1.25 cm (1/2 inch) to guarantee each slider cooks through perfectly and quickly.
- Allow breaded chicken to rest for 10-15 minutes before frying; this crucial step helps the coating adhere better to the chicken, preventing it from falling off during cooking and ensuring a truly crispy crust.
- Maintain the correct oil temperature (medium-high) to achieve a beautifully golden and crispy exterior without burning the breading or making the chicken greasy. Test with a breadcrumb.
- Don't overcrowd the pan when frying; cook in batches if necessary. Overcrowding lowers the oil temperature, leading to steamed rather than fried chicken and a less crispy result.
- Drain fried chicken on a wire rack placed over paper towels to maintain maximum crispness. Resting directly on paper towels can trap steam, which can make the bottom soggy.
Professional Cooking Secrets
- For an extra layer of crunch and deeper flavor, lightly toast the panko breadcrumbs in a dry pan over medium heat until golden brown before using them for breading. Let them cool completely before mixing with the chicken.
- To elevate your honey mustard sauce, consider adding a tiny pinch of smoked paprika for an added layer of complexity and warmth. A dash of Worcestershire sauce can also introduce a subtle umami depth that enhances the overall flavor profile.
- For make-ahead convenience, you can fry the chicken pieces in advance and store them cooled in an airtight container in the refrigerator for up to 3 days. Reheat in a preheated oven or air fryer at 180°C (350°F) for 10-12 minutes to restore crispness before assembling the sliders.

Notes
- Storage: Leftover fried chicken can be stored in an airtight container in the refrigerator for up to 3 days. For best results, reheat in an oven or air fryer to maintain crispness. The honey mustard sauce can be stored separately in the fridge for up to a week.
- Variations: Experiment with different cheeses like Swiss, provolone, or pepper jack for a spicy kick. For additional flavor, add thinly sliced red onion or a drizzle of your favorite hot sauce. Grilled chicken can be used as a healthier alternative, though it won't have the same crispy texture.
- Serving Suggestion: These sliders pair wonderfully with a side of sweet potato fries, a refreshing coleslaw, or a simple green salad for a complete meal.
Frequently Asked Questions
Can I bake or air fry the chicken instead of pan-frying?
Yes, for a healthier option, you can bake the breaded chicken at 200°C (400°F) for 20-25 minutes, flipping halfway through, or air fry at 190°C (375°F) for 12-15 minutes, shaking the basket occasionally, until golden brown and cooked through. While the texture will be slightly different than pan-fried, it will still be delicious.
How far in advance can I make the honey mustard sauce?
The honey mustard sauce can be prepared up to 3-4 days in advance and stored in an airtight container in the refrigerator. In fact, making it ahead allows the flavors to meld beautifully, often resulting in an even more delicious and well-rounded sauce.
What kind of slider buns are best for this recipe?
Soft, slightly sweet brioche slider buns are highly recommended as they complement the savory chicken and sweet-tangy sauce beautifully. Potato rolls or classic white slider buns also work wonderfully for a comforting and familiar taste.
Nutrition Facts (Per Serving)
Calories: Approximately 480 per slider. Protein: 32g, Fat: 28g, Carbohydrates: 28g (estimated, varies based on exact ingredient brands and oil absorption during frying).
Allergy Information
This recipe contains common allergens including wheat (from flour and buns), eggs, and dairy (from mayonnaise and cheese). For a gluten-free version, use gluten-free all-purpose flour, gluten-free panko breadcrumbs, and gluten-free slider buns. Ensure your mayonnaise is dairy-free if required.


No comment