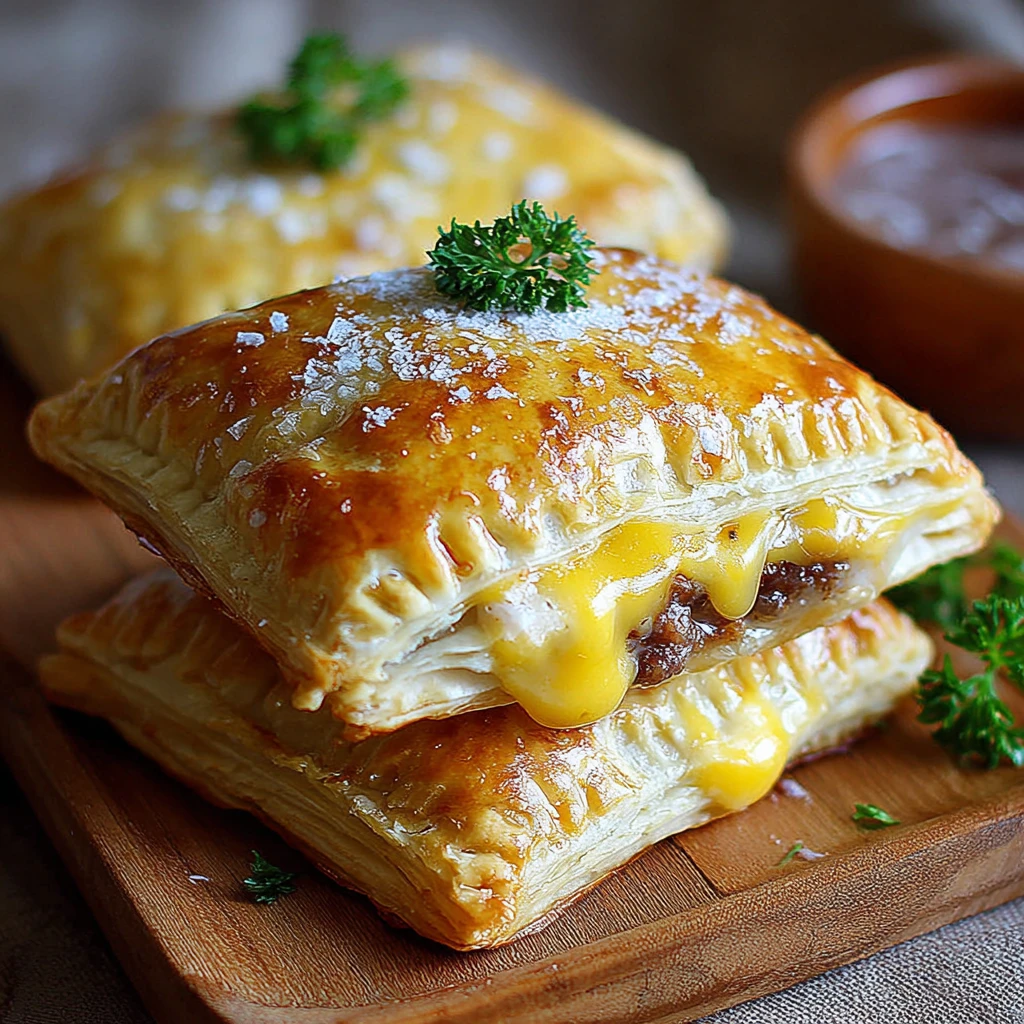
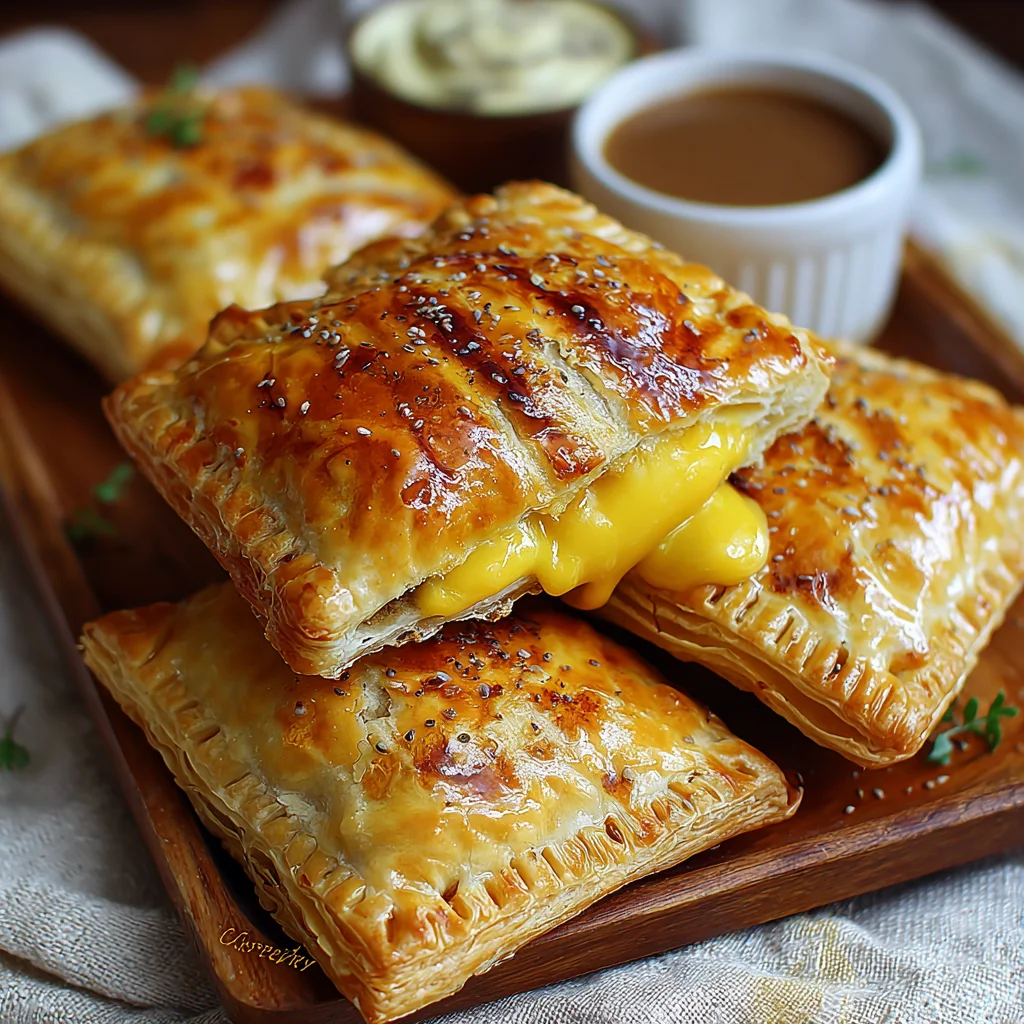
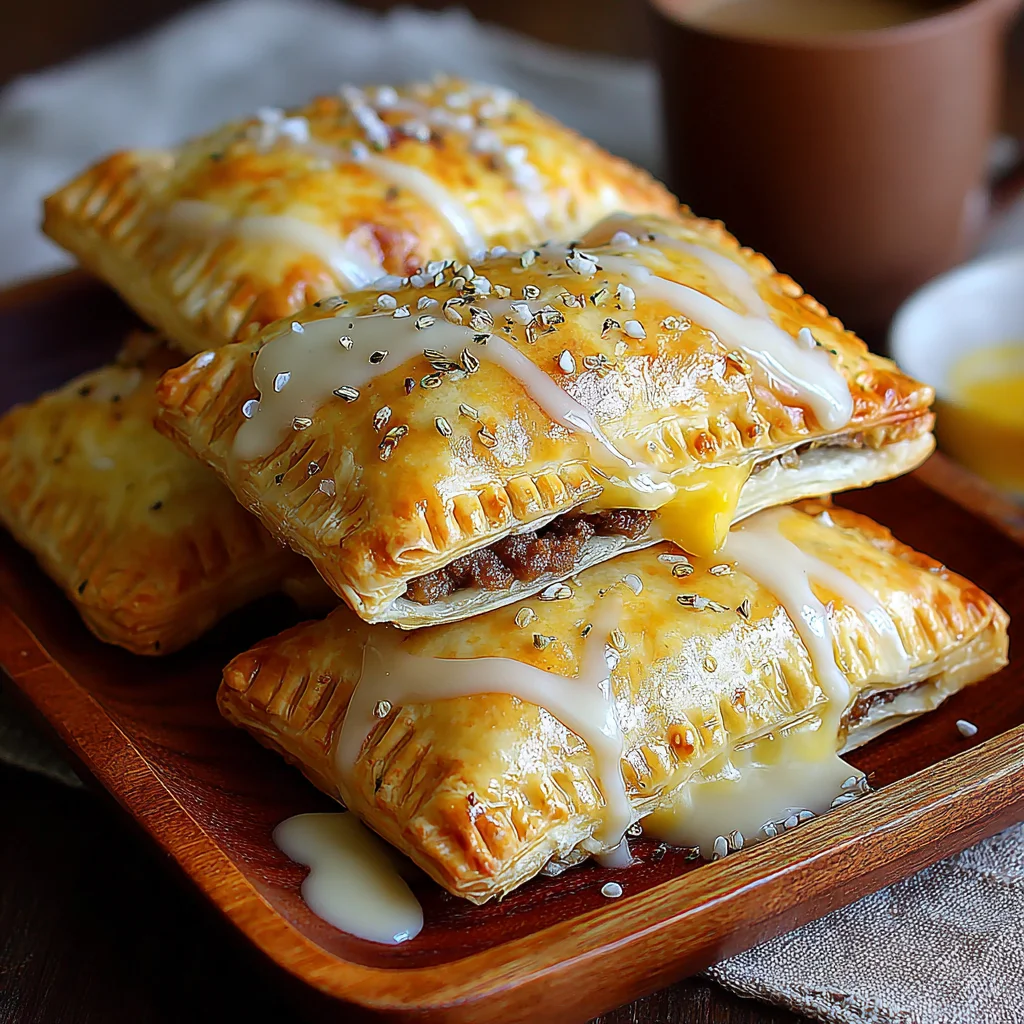
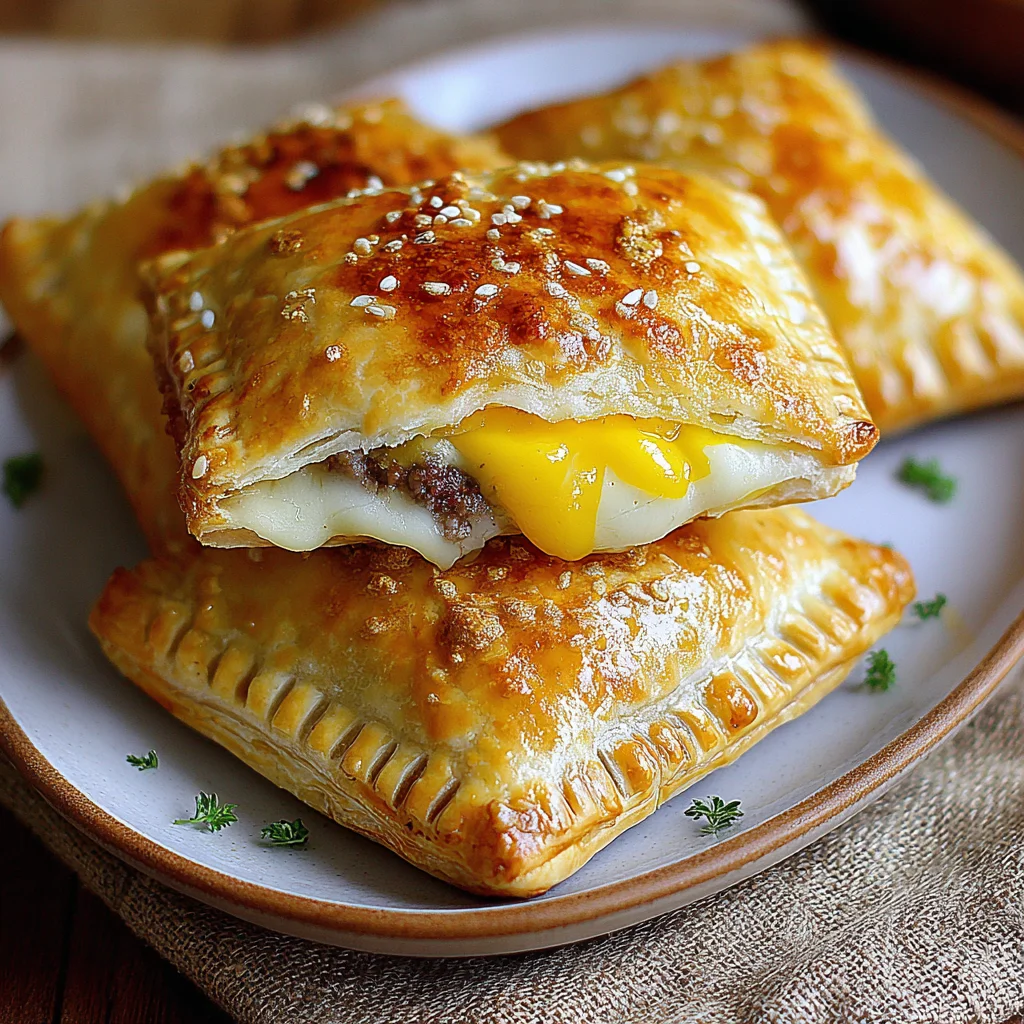
Homemade Breakfast Pop Tarts Your Mornings Will Love
Elevate your breakfast routine with these irresistible Homemade Breakfast Pop-Tarts, a savory twist on a classic treat. Flaky, golden pastry encases a hearty filling of seasoned sausage gravy and perfectly scrambled eggs, making for a truly satisfying start to your day. These handheld delights are perfect for busy mornings or a leisurely brunch, bringing comfort and gourmet flair right to your kitchen.
Prep Time
40 minutes
Cook Time
25 minutes
Total Time
1 hour 5 minutes
Servings
Makes 8-10 pop-tarts
Keywords
Why This Recipe Delivers
- A delightful, savory twist on a classic childhood favorite.
- Perfectly portable for on-the-go mornings or quick snacks.
- Features a rich, flavorful filling of seasoned sausage gravy and scrambled eggs.
- Impressive homemade pastry that's remarkably flaky and golden.
- Customizable with your favorite cheeses and seasonings to suit your palate.
Ingredients
- 240 grams (2 cups) All-Purpose Flour (Substitute with gluten-free flour for a gluten-free version.)
- 226 grams (1 cup) Cold Unsalted Butter, cubed (Use vegan butter for a dairy-free alternative.)
- 60 grams (1/4 cup) Vegetable Shortening, cold (Can be replaced with additional butter or coconut oil.)
- 1 large Egg (for the dough)
- 15 milliliters (1 tablespoon) White Vinegar (White vinegar preferred; lemon juice is a substitute.)
- 120-180 milliliters (1/2-3/4 cup) Ice Cold Water
- A pinch of salt (for the dough)
- 1 large Egg, beaten (for egg wash)
- 225 grams (1 cup) Breakfast Sausage, crumbled (Crumbled bacon or plant-based sausage as alternatives.)
- 4 large Eggs (for filling)
- 120 milliliters (1/2 cup) Whole Milk (Use almond or oat milk for dairy-free needs.)
- 30 grams (2 tablespoons) All-Purpose Flour (for gravy, ensure thorough cooking to avoid a raw taste.)
- 115-150 grams (1 cup) Shredded Cheese, optional (Consider cheddar, pepper jack, or mozzarella for variety.)
- 5 milliliters (1 teaspoon) Seasoned Salt (Adjust to taste.)
- 2.5 milliliters (1/2 teaspoon) Black Pepper (Adjust to taste.)
Instructions
- Prepare the sausage gravy. Brown the breakfast sausage in a large skillet over medium heat, breaking it apart with a spoon, until it is fully cooked and no longer pink, typically 5 to 7 minutes. Drain any excess fat to prevent a greasy filling.
- Create the roux for the gravy. Stir in the 30 grams (2 tablespoons) of all-purpose flour into the cooked sausage, ensuring it coats the sausage pieces evenly. Cook for an additional minute, stirring constantly, to cook out the raw flour taste and create a roux.
- Whisk in the milk for the gravy. Gradually whisk in 120 milliliters (1/2 cup) of whole milk into the sausage and flour mixture. Continue to whisk gently as the gravy thickens to a creamy consistency, usually taking 2-3 minutes. Season the gravy with 5 milliliters (1 teaspoon) of seasoned salt and 2.5 milliliters (1/2 teaspoon) of black pepper, adjusting to your preference. Remove from heat and set aside to cool slightly.
- Scramble the eggs. In a separate skillet, cook the 4 large eggs (for the filling) to your desired consistency. For a creamier texture, cook them over medium-low heat, stirring frequently until just set. If you prefer them firmer, cook a bit longer. Season lightly if desired. Set the scrambled eggs aside to cool slightly.
- Prepare the pastry dough. In a large mixing bowl, combine the 240 grams (2 cups) of all-purpose flour and a pinch of salt. Add the 226 grams (1 cup) of cold, cubed butter and 60 grams (1/4 cup) of cold vegetable shortening. Using a pastry blender or your fingertips, cut the butter and shortening into the flour until the mixture resembles coarse crumbs with some pea-sized pieces of fat remaining. This technique is crucial for achieving a flaky, tender crust.
- Form the dough. In a small bowl, whisk together 1 large egg (for the dough), 15 milliliters (1 tablespoon) of white vinegar, and 120-180 milliliters (1/2-3/4 cup) of ice cold water. Gradually add this liquid mixture to the flour and butter mixture, stirring with a fork until a cohesive dough just forms. Do not overmix; too much handling can make the pastry tough. Gather the dough into two discs, wrap in plastic film, and chill in the refrigerator for at least 30 minutes.
- Roll out the dough. On a lightly floured surface, roll out one of the chilled dough discs to approximately 3 millimeters (⅛-inch) thick. Use a ruler or a pastry wheel to cut the dough into 8-10 rectangles, each measuring about 7.5 cm by 10 cm (3×4 inches). Ensure you have an even number of rectangles for the tops and bottoms of your pop-tarts. Repeat with the second dough disc.
- Assemble the pop-tarts. Place half of the cut dough rectangles onto a baking sheet lined with parchment paper. Brush the edges of each dough rectangle on the baking sheet with the prepared egg wash (1 large egg, beaten with a splash of water).
- Fill the pop-tarts. Place a generous spoonful of the cooled sausage gravy mixture onto the center of each dough rectangle, leaving a clear border of about 1 cm (1/2 inch) around the edges. Top the gravy with a spoonful of the scrambled eggs. If using, sprinkle a small amount of shredded cheese evenly over the filling.
- Seal the pop-tarts. Carefully place the remaining dough rectangles on top of the filled ones, aligning the edges perfectly. Gently press down around the filling to remove any air pockets and ensure good contact between the top and bottom dough layers. Then, use the tines of a fork to firmly crimp and seal all four edges of each pop-tart, which creates a secure closure and the classic pop-tart aesthetic.
- Bake the pop-tarts. Brush the tops of the assembled pop-tarts with the remaining egg wash. If desired, sprinkle with additional shredded cheese and a pinch of seasoned salt or black pepper for extra flavor and visual appeal. Preheat your oven to 190°C (375°F).
- Bake until golden. Transfer the baking sheet to the preheated oven and bake for about 25 minutes, or until the pastry is puffed, golden brown, and cooked through. The exact baking time may vary based on your oven and the thickness of your pop-tarts.
- Thirteenth Step: Cool and serve. Allow the homemade breakfast pop-tarts to cool on the baking sheet for about 5 minutes before carefully transferring them to a wire rack to cool slightly more. This brief resting period helps the filling set. Serve warm and enjoy your delightful homemade treat!
Tools You’ll Need
- Large skillet
- Small skillet
- Large mixing bowl
- Pastry blender or fork
- Rolling pin
- Ruler or pastry wheel (optional, for precise cuts)
- Parchment paper
- Baking sheets
- Pastry brush
- Wire rack
- Small bowl for egg wash
Essential Success Tips
- Keep your pastry ingredients, especially butter and shortening, as cold as possible. This is crucial for achieving a flaky, tender crust, as cold fat creates pockets of steam during baking.
- When cutting in the butter and shortening, avoid overworking the dough; you want distinct, pea-sized pieces of fat, which will create layers and flakiness during baking.
- Do not overmix the dough once the liquid is added. Mix just until it barely comes together, then chill it thoroughly to relax the gluten, preventing a tough crust.
- Ensure your filling is completely cooled before assembling the pop-tarts. Warm filling can melt the butter in the pastry, making it difficult to work with and resulting in a less flaky crust.
- Crimp the edges of the pop-tarts firmly with a fork to create a tight, secure seal, which is essential for preventing the delicious filling from leaking out during baking.
Professional Cooking Secrets
- For an even more tender and flaky crust, try grating your frozen butter directly into the flour mixture before cutting in; this ensures super-fine, even distribution without the risk of overworking the butter.
- A small addition of vinegar (like apple cider or white vinegar) to the dough helps tenderize the gluten, making for a more pliable dough that's easier to roll and results in an even flakier baked pastry.
- If you're making these ahead, underbake them slightly (by about 5 minutes). Reheat them in a toaster oven for a few minutes to crisp them up perfectly and finish the bake, giving you that 'fresh-from-the-oven' experience whenever you desire.
Notes
- Storage: Store leftover breakfast pop-tarts in an airtight container in the refrigerator for up to 3 days. Reheat gently in a toaster oven or microwave for the best texture.
- Freezing: Baked and cooled pop-tarts can be frozen for up to 1 month. Wrap individually in plastic film and then place in a freezer-safe bag. Thaw in the refrigerator overnight and reheat as desired.
- Variations: Experiment with different savory fillings! Try crumbled bacon and sharp cheddar, sautéed spinach and feta, or even a spicy chorizo and potato mix. For a sweet treat, use your favorite fruit jam.
- Gluten-Free Option: Substitute all-purpose flour with a 1:1 gluten-free baking flour blend for both the pastry and the gravy to accommodate dietary needs.
- Dairy-Free Option: Use vegan butter, a plant-based milk (such as unsweetened almond or oat milk), and omit the cheese for a delicious dairy-free version.
Frequently Asked Questions
Can I prepare these breakfast pop-tarts ahead of time?
Absolutely! You can prepare the dough and both the sausage gravy and scrambled egg filling components a day in advance and store them separately in airtight containers in the refrigerator. Assemble and bake the pop-tarts fresh in the morning, or bake them completely and gently reheat for a quicker option.
How do I prevent the filling from leaking out during baking?
The key is to not overfill the pop-tarts and to ensure a very firm seal around the edges. Brushing the bottom pastry edges with egg wash before adding the top layer helps create a good adhesive bond, and then crimping firmly all around with a fork ensures a secure closure that withstands the heat of the oven.
What kind of cheese works best for this recipe?
Cheddar is a classic choice for its sharp, savory flavor that complements the sausage and eggs beautifully. However, pepper jack adds a nice subtle kick, and mozzarella offers a mild, wonderfully melty texture. Feel free to use your favorite shredded cheese or a blend to customize the flavor profile.
Nutrition Facts (Per Serving)
Calories: Approximately 400-500 per pop-tart, Protein: 20-25g, Fat: 25-35g, Carbohydrates: 30-40g. (Values are estimates and can vary significantly based on specific ingredients, brand choices, and exact portion sizes.)
Allergy Information
Contains dairy, gluten, and eggs. For a gluten-free version, use a certified gluten-free flour blend. For a dairy-free alternative, substitute with vegan butter, plant-based milk, and omit the cheese. Always check individual ingredient labels for hidden allergens to ensure suitability for specific dietary restrictions.


No comment