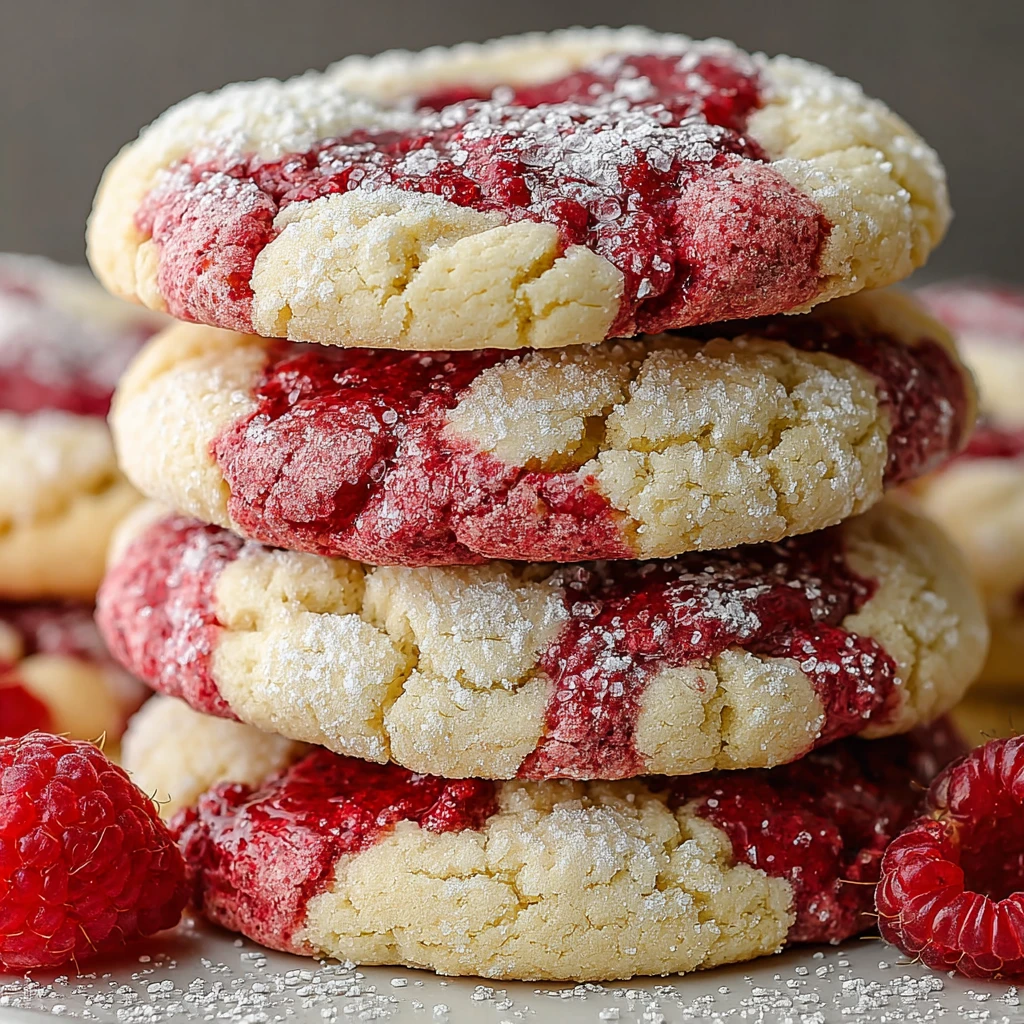
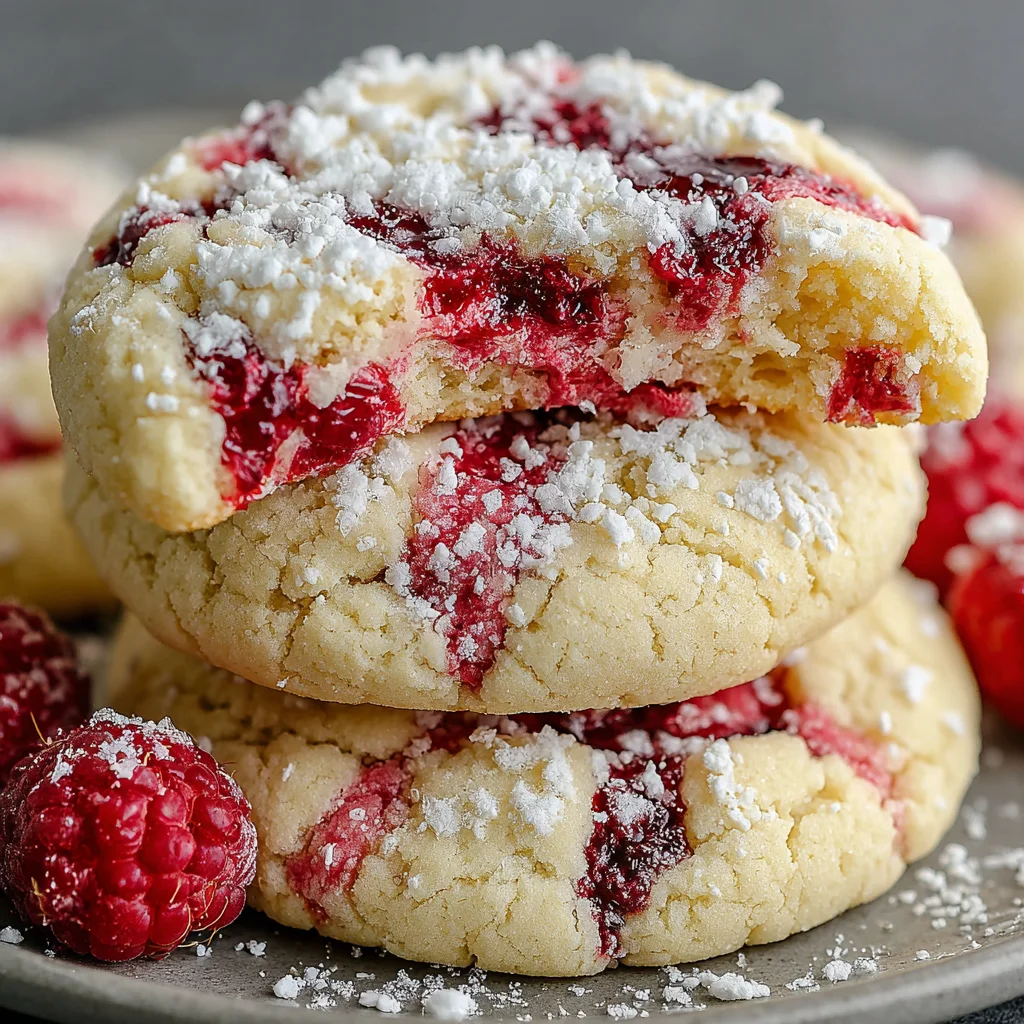
Soft & Chewy Raspberry Sugar Cookies
Indulge in the delightful combination of tender, buttery sugar cookies infused with the vibrant, fruity burst of raspberry. These cookies boast a perfectly soft and chewy texture with slightly crisp edges, making them an irresistible treat for any occasion. A hint of cinnamon-sugar coating adds an extra layer of warmth and sweetness, complementing the bright berry notes beautifully.
Prep Time
20 minutes
Cook Time
10-12 minutes
Total Time
Approximately 45 minutes, plus cooling time
Servings
Makes about 24 cookies
Keywords

Why This Recipe Delivers
- Features a delightful balance of sweet and tangy flavors from the raspberry and optional lemon zest.
- Boasts an irresistible soft and chewy texture with perfectly crisp edges, satisfying every bite.
- Perfect for any occasion, from casual snacking and lunchbox treats to elegant dessert platters.
- Relatively quick and easy to make, making it accessible even for novice bakers.
- Offers a beautiful presentation with optional fresh fruit and powdered sugar garnish.
Ingredients
- 300g (2 1/2 cups) all-purpose flour
- 5g (1 teaspoon) baking soda
- 1g (1/4 teaspoon) fine sea salt
- 226g (1 cup) unsalted butter, softened to room temperature
- 250g (1 1/4 cups) granulated sugar, plus 50g (1/4 cup) for rolling
- 1 large egg (approx. 50-60g), at room temperature
- 5ml (1 teaspoon) pure vanilla extract
- 2.5ml (1/2 teaspoon) almond extract (optional)
- 120g (1/2 cup) high-quality raspberry jam or 120g (1/2 cup) fresh raspberries, lightly mashed
- 2g (1/2 teaspoon) fresh lemon zest (optional)
- 2.5g (1/2 teaspoon) ground cinnamon, for rolling
- Fresh raspberries, for garnish (optional)
- Powdered sugar, for dusting (optional)
Instructions
- Preheat your oven to 175°C (350°F). Line two large baking sheets with parchment paper or silicone mats to prevent sticking and ensure even baking.
- In a medium-sized bowl, thoroughly whisk together the all-purpose flour, baking soda, and fine sea salt. Whisking ensures these dry ingredients are evenly distributed, which is crucial for the cookie's texture and rise. Set this mixture aside.
- In a large mixing bowl, using a hand mixer or stand mixer fitted with the paddle attachment, cream together the softened unsalted butter and 250g (1 1/4 cups) granulated sugar on medium speed. Continue mixing for 2-3 minutes until the mixture is visibly light in color and fluffy in texture. This step incorporates air, contributing to the cookies' softness.
- Add the room temperature large egg, pure vanilla extract, and almond extract (if using) to the creamed butter and sugar mixture. Beat on medium speed until all ingredients are just combined and smooth. Ensure the egg is fully incorporated.
- Gently fold in the raspberry jam or lightly mashed fresh raspberries, along with the fresh lemon zest (if using). Mix minimally, just until the fruit is evenly distributed throughout the wet mixture. Overmixing here can toughen the cookies.
- Gradually add the reserved dry ingredients to the wet mixture, mixing on low speed until the dough just comes together. Stop mixing as soon as no streaks of flour are visible. Overmixing gluten development will lead to a tougher cookie.
- In a small separate bowl, combine the remaining 50g (1/4 cup) of granulated sugar and 2.5g (1/2 teaspoon) ground cinnamon for the rolling mixture. This coating adds a delightful aroma and a slight textural crunch.
- Scoop tablespoon-sized portions of dough. For consistent size, use a cookie scoop. Roll each portion gently between your palms to form smooth balls.
- Roll each dough ball evenly in the cinnamon-sugar mixture, ensuring it's well coated on all sides. This not only adds flavor but also helps create those perfectly crisp edges.
- Place the coated dough balls onto the prepared baking sheets, ensuring they are spaced approximately 5 cm (2 inches) apart to allow for spreading during baking.
- Gently press down on the center of each dough ball with the back of a spoon or your fingertips to slightly flatten them. This helps achieve a more uniform cookie shape and aids in even baking.
- Bake for 10-12 minutes, or until the edges appear lightly golden and the centers are set but still look slightly soft. Avoid overbaking, as this will result in a dry cookie rather than a soft and chewy one.
- Thirteenth Step: Once baked, remove the baking sheets from the oven and allow the cookies to cool on the hot sheet for 5 minutes. This allows them to firm up slightly before being moved.
- Fourteenth Step: Carefully transfer the partially cooled cookies to a wire rack to cool completely. Cooling on a rack ensures air circulation, preventing the bottoms from becoming soggy.
- Fifteenth Step: Optionally, before serving, garnish the cooled cookies with a few fresh raspberries placed on top and a light dusting of powdered sugar for an elegant presentation and an extra touch of sweetness.

Tools You’ll Need
- Large mixing bowls
- Medium bowl
- Small bowl
- Hand mixer or stand mixer with paddle attachment
- Whisk
- Rubber spatula
- Measuring cups and spoons (or kitchen scale for accuracy)
- Baking sheets
- Parchment paper or silicone baking mats
- Cookie scoop (optional, for even portions)
- Wire cooling rack
Essential Success Tips
- Ensure both the butter and egg are at room temperature. This allows for a smoother, emulsified dough that bakes more evenly and results in a better texture.
- Do not overmix the dough once the flour is added. Mixing only until the flour streaks disappear prevents excess gluten development, which can lead to tough rather than chewy cookies.
- Chilling the dough for 15-30 minutes before rolling can significantly improve its manageability, especially if your kitchen is warm, and helps prevent excessive spreading.
- Bake until the edges are just set and lightly golden, but the centers still look slightly soft and puffy. They will continue to set as they cool on the baking sheet, ensuring a perfectly soft and chewy interior.
- Space cookies adequately on the baking sheet (at least 5 cm or 2 inches apart) to allow for natural spreading and even air circulation during baking, preventing them from merging.
Professional Cooking Secrets
- For an intensified and more integrated raspberry flavor, gently warm the raspberry jam slightly (just a few seconds in the microwave) before folding it into the dough. This helps it emulsify more smoothly and releases its aromatic compounds.
- To achieve a deeper, more natural berry color and flavor without adding excess moisture, consider incorporating a small amount of freeze-dried raspberry powder (about 1-2 teaspoons) into the dry ingredients.
- For perfectly round cookies, use a large round cookie cutter (slightly larger than your baked cookies) to gently 'scoot' around the warm cookies immediately after removing them from the oven. This molds them into an ideal circular shape.
Notes
- Storage: Store cooled cookies in an airtight container at room temperature for up to 3-4 days. For longer storage, freeze them for up to 2 months; thaw at room temperature before serving.
- Variations: Feel free to experiment with other fruit jams like strawberry, apricot, or blueberry. You can also omit the cinnamon-sugar rolling for a classic plain sugar cookie, or add a white chocolate drizzle after the cookies have cooled completely.
- Using Fresh Raspberries: If opting for fresh raspberries instead of jam, gently mash them with a fork. To help absorb some moisture, you might lightly toss the mashed raspberries with about 1 teaspoon of flour before incorporating them into the dough, although for this quantity it's often not strictly necessary.
Frequently Asked Questions
Can I use frozen raspberries instead of fresh or jam?
Yes, you can use frozen raspberries. Make sure to thaw them completely, drain any excess liquid thoroughly, and then mash them gently before adding them to the cookie dough.
My cookies spread too much while baking. What might have gone wrong?
Excessive spreading can occur if your butter was too soft or melted, if the dough was not chilled sufficiently, or if there wasn't enough flour relative to the wet ingredients. Ensure your butter is softened, not melted, and consider chilling the dough for at least 30 minutes if it feels particularly sticky or if your kitchen is warm.
Can I prepare the cookie dough ahead of time?
Absolutely! The cookie dough can be prepared and stored, well-covered, in the refrigerator for up to 3 days. When ready to bake, scoop and roll the dough balls as instructed. You can also freeze raw cookie dough balls for up to 2 months; bake directly from frozen, adding an extra 2-3 minutes to the baking time.
Nutrition Facts (Per Serving)
Approximately per cookie (based on 24 servings): Calories: 190, Total Fat: 10g, Saturated Fat: 6g, Cholesterol: 28mg, Sodium: 90mg, Total Carbohydrates: 26g, Dietary Fiber: 1g, Sugars: 18g, Protein: 2g.
Allergy Information
Contains wheat, dairy (from butter), and egg. For a dairy-free version, use a high-quality plant-based butter alternative. For an egg-free version, a flax egg or other egg substitute can be used, though texture may vary slightly.


No comment