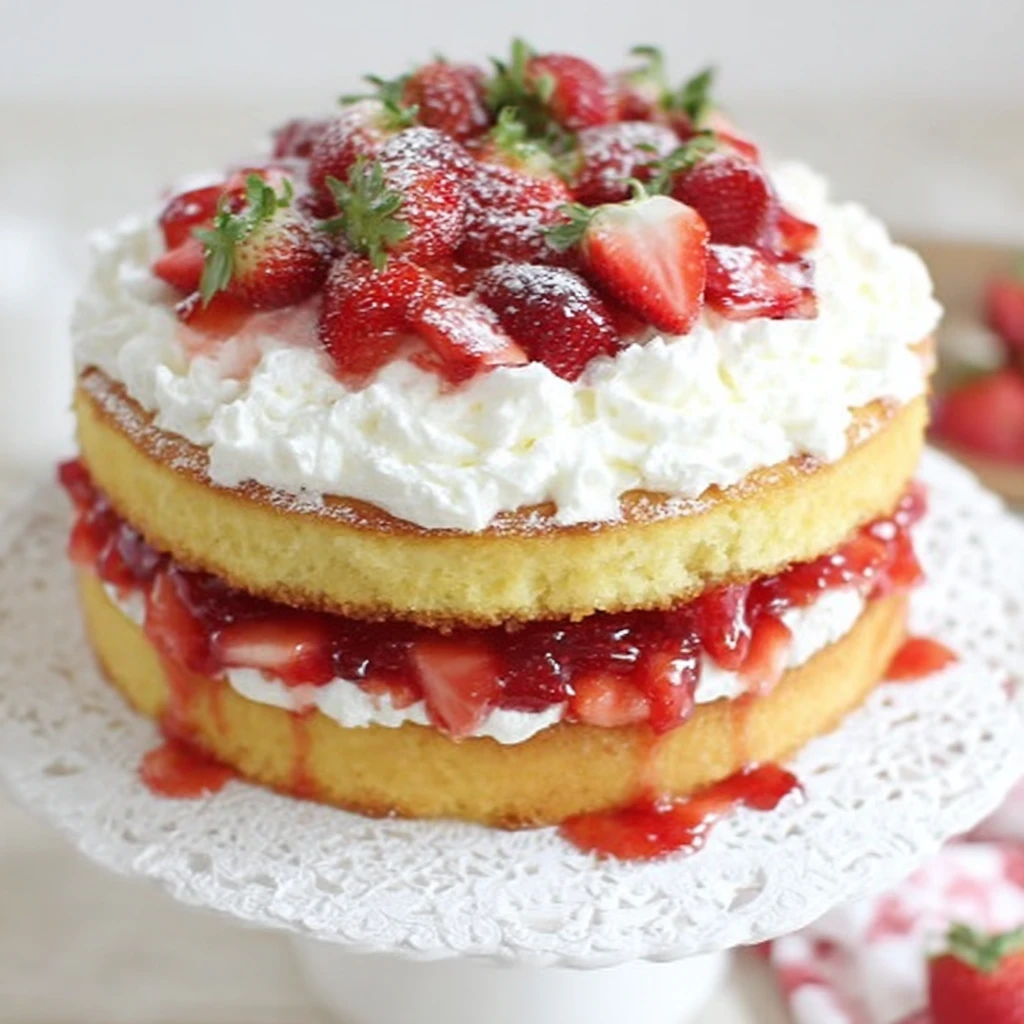
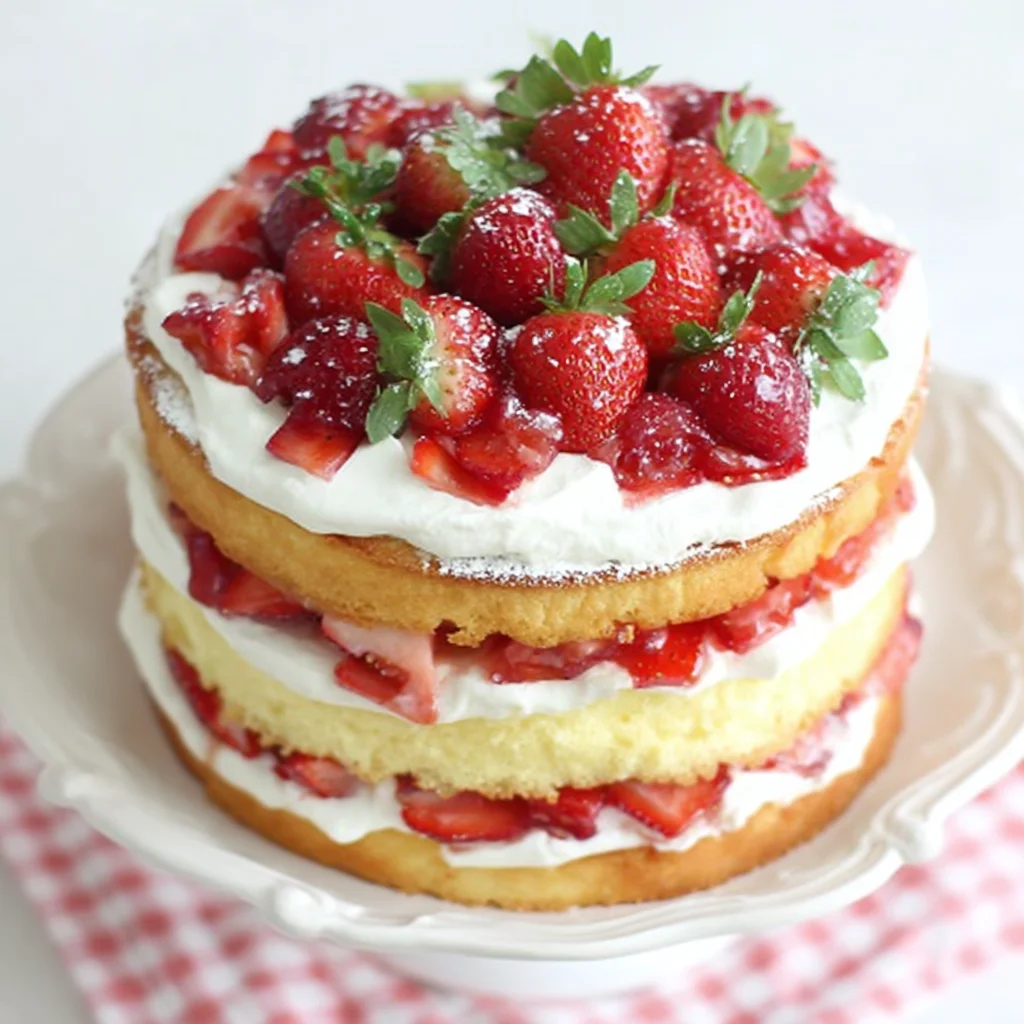
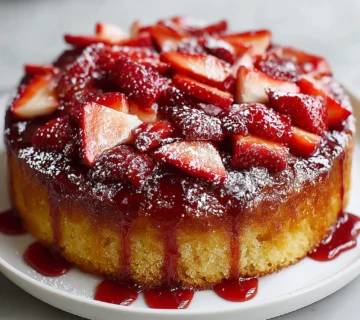
The Best Strawberry Shortcake Cake
Experience the ultimate dessert with this Strawberry Shortcake Cake, a delightful fusion of a classic shortcake and a celebratory layer cake. Featuring tender, airy vanilla cake layers, generous dollops of luscious cream cheese-enhanced whipped cream, and vibrant, macerated fresh strawberries, this cake delivers a symphony of textures and flavors. It's a show-stopping dessert that promises to be the star of any gathering, offering a taste of pure summer bliss in every bite.
Prep Time
1 hour 15 minutes
Cook Time
25-30 minutes
Total Time
3 hours 30 minutes (including essential chilling)
Servings
12-16 servings
Keywords
Why This Recipe Delivers
- Layers of light, tender vanilla cake perfectly complement the fresh, juicy strawberries.
- The whipped cream frosting is elevated with a hint of cream cheese, adding richness and stability.
- Features fresh, vibrant strawberries that burst with natural sweetness.
- Visually stunning and impressive, making it ideal for celebrations or special occasions.
- Offers a harmonious balance of sweet, tangy, and creamy textures in every bite.
Ingredients
- 360 grams (3 cups) all-purpose flour
- 15 grams (1 tablespoon) baking powder
- 5 grams (1 teaspoon) fine sea salt
- 170 grams (3/4 cup) unsalted butter, at room temperature
- 300 grams (1 1/2 cups) granulated sugar
- 4 large eggs, at room temperature
- 15 milliliters (1 tablespoon) vanilla extract
- 60 milliliters (1/4 cup) vegetable oil, canola oil, or light olive oil
- 60 milliliters (1/4 cup) full-fat sour cream
- 240 milliliters (1 cup) whole milk or 2% milk
- 900-1000 grams (2 pints) fresh ripe strawberries
- 15 milliliters (1 tablespoon) Sprouts Organic Balsamic Glaze (optional)
- 25 grams (2 tablespoons) granulated sugar
- 480 milliliters (2 cups) heavy whipping cream, chilled
- 90 grams (3/4 cup) powdered sugar, divided
- 5 milliliters (1 teaspoon) vanilla extract
- 113 grams (4 ounces) full-fat cream cheese, softened at room temperature
Instructions
- Preheat your oven to 175°C (350°F).
- Prepare three 20-cm (8-inch) round cake pans. Lightly grease the sides of each pan, then dust with flour, tapping out any excess. Line the bottom of each pan with a circle of parchment paper.
- In a medium-sized bowl, combine the flour, baking powder, and salt. Whisk these dry ingredients together thoroughly to ensure even distribution of leavening agents, then set the bowl aside.
- In the bowl of an electric stand mixer fitted with the paddle attachment, beat the softened butter on medium speed until it is smooth and creamy. Gradually add the granulated sugar, continuing to beat for 3-5 minutes until the mixture is light, fluffy, and pale in color. This creaming process incorporates air, which is crucial for a tender cake texture.
- With the mixer still running on medium speed, add the eggs one at a time, beating for at least 10-20 seconds after each addition. This allows each egg to be fully incorporated and adds more air to the batter, contributing to the cake's light structure.
- Add the vanilla extract and vegetable oil to the batter, blending well until fully combined.
- Incorporate the sour cream into the batter, mixing until just combined. The sour cream adds moisture and a subtle tang, enhancing the cake's flavor and tenderness.
- Reduce the mixer speed to low. Pour in approximately half of the milk, followed by half of the dry flour mixture. Mix until just combined. Repeat this process with the remaining milk and flour mixture. Blend only until all ingredients are just incorporated. Stop the mixer, scrape down the sides of the bowl with a spatula, and give the batter a final few stirs by hand to ensure everything is evenly blended without overmixing.
- Divide the prepared cake batter evenly among the three prepared cake pans.
- Bake the cakes in the preheated 175°C (350°F) oven for 22-30 minutes. The cakes are done when they have a slight dome, appear golden brown, and a wooden skewer or toothpick inserted into the center comes out clean or with a few moist crumbs, but no wet batter.
- Allow the cakes to cool in their pans for 5-10 minutes. Then, carefully invert them onto a wire cooling rack and remove the pans, leaving the parchment paper attached to the bottoms. Once the cakes are mostly cool to the touch, wrap each layer tightly in plastic wrap and transfer them to the freezer for at least 30-60 minutes. This step locks in moisture and makes the layers much easier to handle, stack, and frost.
- While the cakes are cooling, prepare the strawberries. Dice the fresh strawberries into small, even pieces. If desired, set aside a few whole, perfect berries for garnish later. Place the diced strawberries in a large bowl.
- Thirteenth Step: Drizzle the optional balsamic glaze over the strawberries, then sprinkle the 25 grams (2 tablespoons) of granulated sugar over them. Stir gently until the berries are evenly coated. The sugar will draw out the natural juices, creating a delicious syrup. Cover the bowl and place it in the refrigerator while you prepare the whipped cream.
- Fourteenth Step: To prepare the whipped cream, place your mixing bowl and the whisk attachment (or electric mixer beaters) in the freezer for at least 5 minutes. This chilling helps the cream whip up faster and holds its structure better.
- Fifteenth Step: Pour the chilled heavy cream into the frozen mixing bowl. Begin beating on medium-high speed until the cream starts to thicken and soft peaks begin to form.
- Sixteenth Step: While continuing to beat, gradually add 30 grams (1/4 cup) of the powdered sugar into the cream, reserving the remaining 60 grams (1/2 cup) for later. Add the 5 milliliters (1 teaspoon) of vanilla extract.
- Seventeenth Step: Continue beating until the cream is light, fluffy, and holds soft, distinct peaks. Be careful not to overbeat, or it will become grainy.
- Eighteenth Step: Gently transfer the whipped cream from the mixing bowl into a separate large bowl. Place it in the refrigerator to keep it cold while you prepare the cream cheese mixture.
- Nineteenth Step: In the now empty (but scraped clean) mixing bowl, add the softened cream cheese. Beat on medium speed until it is completely smooth and free of any lumps. This step is critical for a silky-smooth frosting.
- Twentieth Step: Add the reserved 60 grams (1/2 cup) of powdered sugar to the smooth cream cheese and beat until fully combined and lightened.
- Twenty-first Step: Scoop out 60 milliliters (1/4 cup) of the glazed diced strawberries (from the bowl in the fridge) and add them to the cream cheese mixture. Blend briefly until just incorporated, adding a subtle strawberry flavor to the cream cheese base.
- Twenty-second Step: Retrieve the whipped cream from the refrigerator. Add one large scoop (about 180 milliliters or 3/4 cup) of the whipped cream to the cream cheese mixture in the mixer bowl. Blend on low speed just until the cream cheese mixture lightens and becomes a bit fluffier. Then, add the remaining whipped cream and fold it in gently by hand with a spatula, or blend on the lowest speed for only a few seconds, until all ingredients are just combined. Avoid overmixing, as this can deflate the whipped cream.
- Twenty-third Step: Remove the chilled cake layers from the freezer, unwrap them, and carefully peel off the parchment paper from the bottoms.
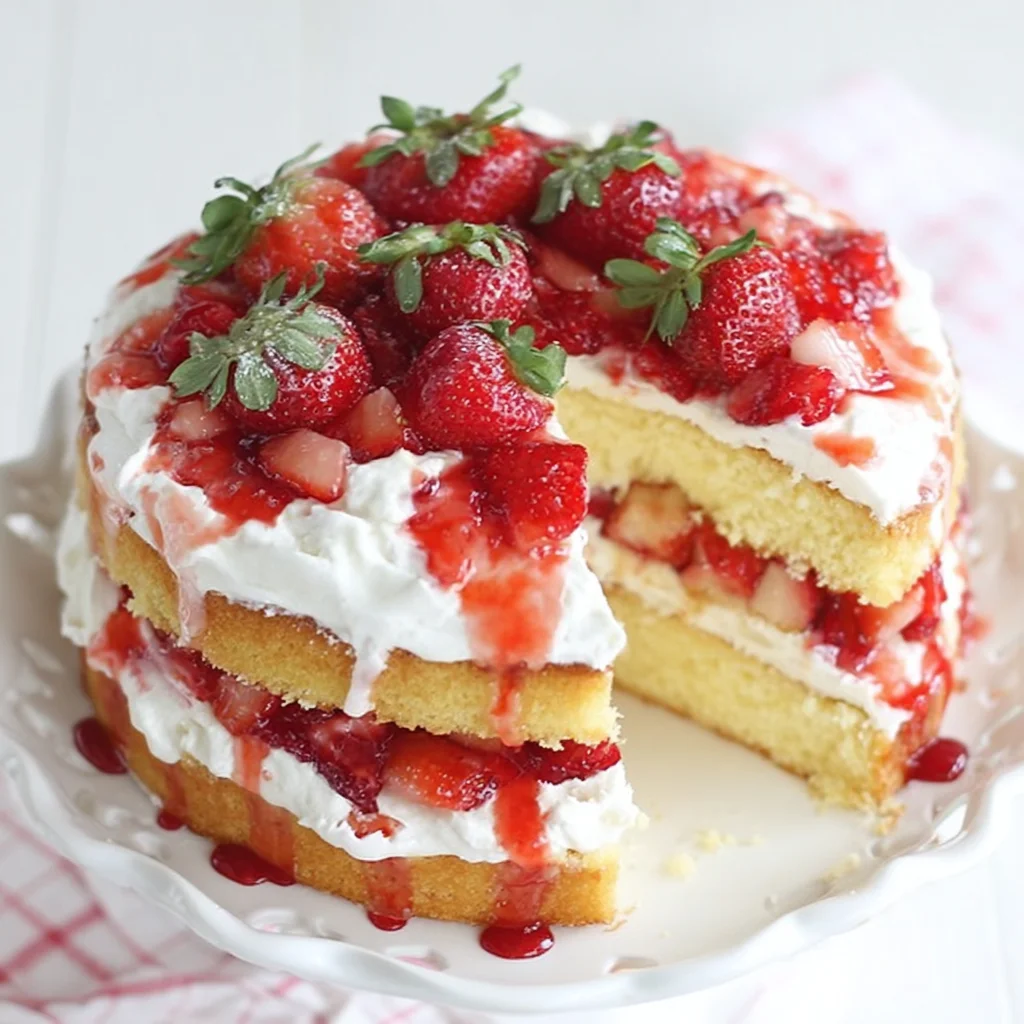
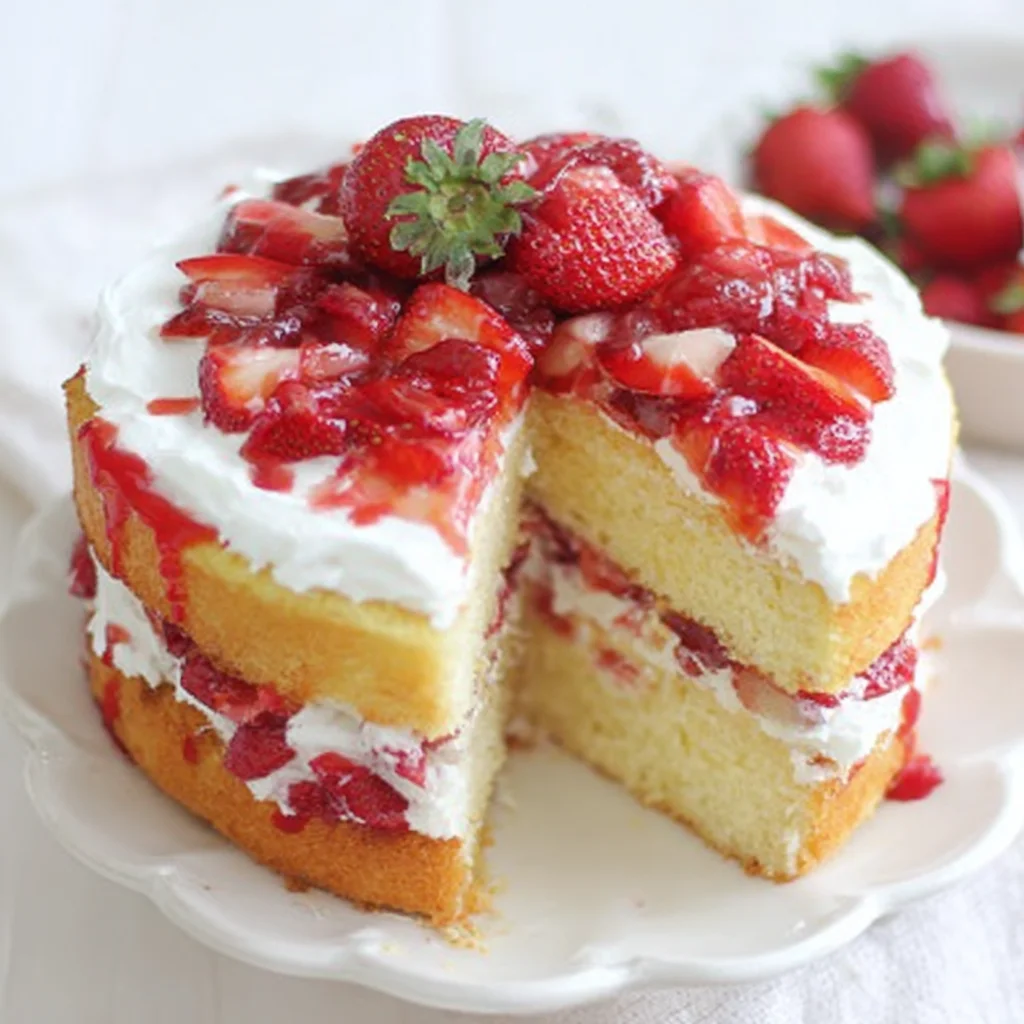
- Twenty-fourth Step: Place one cake layer on your serving plate or cake stand. Spread approximately one-third of the prepared whipped cream mixture evenly over the cake layer, using an offset spatula to level it if needed.
- Twenty-fifth Step: Add a layer of the macerated strawberries, using about one-third of the total mixture. You may choose to leave some of the accumulated liquid in the bowl, as too much can make the cake soggy.
- Twenty-sixth Step: Repeat with the second cake layer, another third of the whipped cream, and another third of the strawberries. Place the final cake layer on top, then spread the remaining whipped cream over the top and sides of the cake. Decorate with the remaining strawberries, and if desired, garnish with the few whole strawberries you reserved earlier.
- Twenty-seventh Step: Serve the cake immediately, or refrigerate it until serving. The Strawberry Shortcake Cake is best enjoyed within 1-2 hours of assembly for optimal freshness and texture.
Tools You’ll Need
- Three 20-cm (8-inch) round cake pans
- Parchment paper
- Electric stand mixer or hand mixer
- Large mixing bowls (2-3)
- Whisk
- Rubber spatula
- Measuring cups and spoons (or kitchen scale)
- Wire cooling rack
- Offset spatula (for frosting)
- Sharp knife for dicing strawberries
Essential Success Tips
- Ensure all dairy ingredients (butter, eggs, sour cream, cream cheese) are at room temperature for a smooth, emulsified cake batter and lump-free cream cheese mixture.
- Do not overmix the cake batter once the flour is added; blend only until just combined to prevent a tough cake.
- Chill your mixing bowl and whisk attachment thoroughly before whipping cream; this significantly helps the cream achieve maximum volume and stability.
- When incorporating the whipped cream into the cream cheese mixture, fold it in gently and avoid overmixing to maintain a light, airy texture.
- Freezing the cake layers after they've cooled helps firm them up, making them much easier to handle, stack, and frost without crumbling.
Professional Cooking Secrets
- For the most vibrant strawberry flavor, choose ripe, in-season berries. A touch of balsamic glaze (even a good quality vinegar) enhances their sweetness and adds depth, a secret many chefs use for fruit.
- To achieve an incredibly tender cake, ensure your butter and sugar are creamed until very light and fluffy. This process is key for aerating the batter and creating a delicate crumb.
- When assembling, don't just dump all the macerated strawberry liquid. Use the berries, but control the amount of liquid to prevent the cake from becoming overly soggy, especially if making it ahead.
Notes
- Storage: The assembled cake is best served within 1-2 hours. If storing, keep refrigerated in an airtight container for up to 2 days. The cake's texture is optimal when consumed fresh.
- Make-Ahead: The cake layers can be baked, wrapped well, and frozen for up to 2 weeks. Thaw in the refrigerator overnight before assembling. The strawberries can be macerated a few hours ahead of time.
- Variations: For a lemon-infused cake, add 1 tablespoon of lemon zest to the cake batter. You can also experiment with different berries, such as raspberries or blueberries, for seasonal variations.
Frequently Asked Questions
Can I use frozen strawberries for this recipe?
While fresh, ripe strawberries are highly recommended for the best flavor and texture, you can use frozen unsweetened strawberries in a pinch. Thaw them completely, drain any excess liquid, and then proceed with the macerating steps. Be aware that the texture may be slightly softer.
My whipped cream isn't thickening. What should I do?
Ensure your heavy cream is very cold, directly from the refrigerator, and that your mixing bowl and whisk attachment are thoroughly chilled (preferably frozen for 5-10 minutes). If it's still not thickening, it might be due to low-fat cream, or the cream might be too warm. Try chilling everything again, and ensure you're using heavy whipping cream with at least 36% milk fat.
How far in advance can I assemble the cake?
For the absolute best results, assemble the cake no more than 1-2 hours before serving, as the strawberries can start to release more liquid and soften the cake layers over time. However, it can be refrigerated for up to 2 days; just know the texture will be slightly less pristine.
Nutrition Facts (Per Serving)
Calories: Approximately 450-550 per serving, Protein: 6-8g, Fat: 25-35g, Carbs: 50-65g (Estimates based on 16 servings of a rich cake with cream and fruit; actual values may vary).
Allergy Information
Contains wheat, dairy (butter, eggs, milk, sour cream, heavy cream, cream cheese). May contain traces of nuts if prepared in a facility that processes them. For a gluten-free version, substitute with a gluten-free all-purpose flour blend suitable for baking.


No comment