
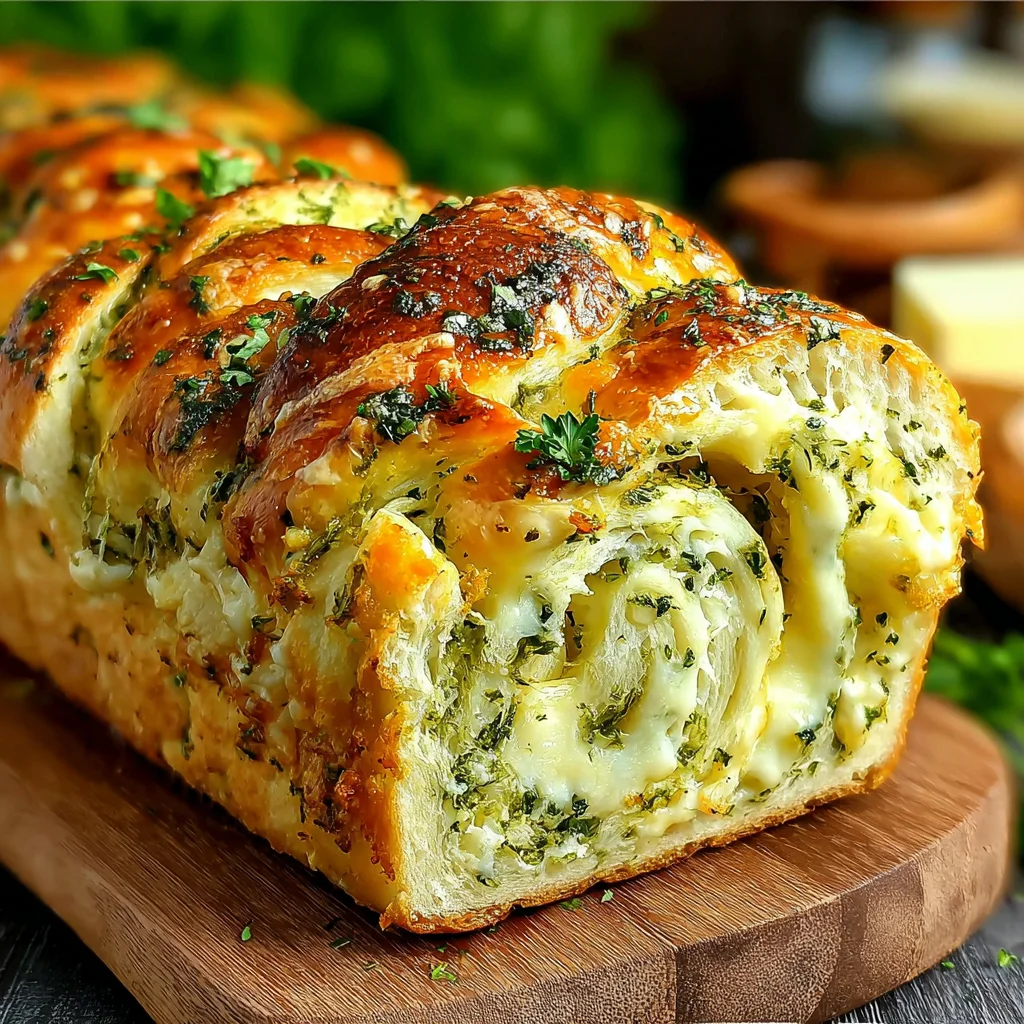
Swirled Garlic Herb And Cheese Bread
Indulge in the irresistible aroma and flavor of this Swirled Garlic Herb and Cheese Bread. Layers of soft, pillowy dough are generously filled with a vibrant blend of fresh garlic, aromatic herbs, and two kinds of melted cheese, all swirled into a visually stunning loaf. This bread is a perfect accompaniment to any meal or a delightful appetizer on its own.
Prep Time
45 minutes
Cook Time
30-35 minutes
Total Time
Approximately 3 hours 20 minutes (including proofing)
Servings
1 loaf, yielding 8-10 slices
Keywords
Why This Recipe Delivers
- Bursting with aromatic garlic and fresh herbs, offering a truly captivating flavor profile.
- Features an irresistible combination of gooey mozzarella and sharp Parmesan cheese.
- The stunning swirled design makes it a beautiful centerpiece for any table or gathering.
- Achieves a perfect balance of a soft, fluffy interior with a golden, slightly crisp crust.
- Versatile as an elegant appetizer, a flavorful side dish, or a satisfying snack on its own.
Ingredients
- 420 g (3 ½ cups) all-purpose flour
- 7 g (2 ¼ tsp, 1 packet) active dry yeast
- 240 mL (1 cup) warm milk (around 40°C / 105°F)
- 50 g (¼ cup) granulated sugar
- 5 g (1 tsp) salt
- 1 large egg
- 55 g (¼ cup) unsalted butter, softened
- 220 g (2 cups) shredded mozzarella cheese
- 50 g (½ cup) grated Parmesan cheese
- 3 cloves garlic, minced or roasted
- 30 mL (2 tbsp) chopped fresh parsley
- 15 mL (1 tbsp) chopped fresh thyme
- 15 mL (1 tbsp) chopped fresh oregano (or 5 mL / 1 tsp dried oregano)
- 30 g (2 tbsp) unsalted butter, melted (for brushing)
- Salt and freshly ground black pepper, to taste
- 1 large egg, beaten (for egg wash)
- Extra fresh herbs or shredded cheese, for garnish (optional)
Instructions
- Activate the Yeast. In a small bowl, combine the 240 mL (1 cup) of warm milk and 50 g (¼ cup) of granulated sugar. Sprinkle the 7 g (2 ¼ tsp) of active dry yeast over the top and let it sit for 5–10 minutes until foamy. This crucial step ensures the yeast is alive and active, ready to provide the necessary leavening power for a light and airy dough. If no foam appears, your yeast may be old or the milk temperature was incorrect, and you should start with new yeast.
- Prepare the Dough. In the bowl of a stand mixer fitted with a dough hook, combine the 420 g (3 ½ cups) of all-purpose flour and 5 g (1 tsp) of salt. Add the large egg, 55 g (¼ cup) of softened unsalted butter, and the activated yeast mixture. Begin mixing on low speed until the ingredients start to come together and a shaggy dough forms. Increase the speed to medium and continue to knead for 7–8 minutes until the dough becomes smooth, elastic, and pulls away cleanly from the sides of the bowl. Proper kneading develops the gluten, which is essential for the bread's structure and chewiness.
- First Proof. Gently transfer the kneaded dough to a large bowl that has been lightly greased with oil. Turn the dough once to coat it lightly with the oil. Cover the bowl securely with a clean kitchen towel or plastic wrap to prevent a skin from forming. Place the bowl in a warm, draft-free spot (such as a turned-off oven with the light on) and let the dough rise for 1 to 1.5 hours, or until it has visibly doubled in size. This primary fermentation allows the yeast to work its magic, building flavor and texture.
- Roll and Fill. Once the dough has completed its first rise, gently punch it down to release the trapped gases. Turn the dough out onto a lightly floured clean work surface. Using a rolling pin, roll the dough into a large rectangle, approximately 30 cm by 40 cm (12 inches by 16 inches) and about 6 mm (¼ inch) thick. Evenly brush the entire surface of the dough with 30 g (2 tbsp) of melted unsalted butter, ensuring coverage right to the edges. Then, generously sprinkle the 220 g (2 cups) of shredded mozzarella, 50 g (½ cup) of grated Parmesan, the minced or roasted garlic, and all the chopped fresh herbs (parsley, thyme, oregano). Season lightly with salt and freshly ground black pepper to taste, distributing the flavors evenly.
- Shape the Swirl. Starting from one of the long sides of the rectangle, carefully and tightly roll the dough into a firm log. Ensure the roll is snug to create distinct swirls. Pinch the seam closed firmly to seal it. Using a sharp knife or bench scraper, slice the log lengthwise down the exact middle, from one end to the other, to expose the beautiful layers of filling. Gently twist the two halves together, keeping the cut sides facing upwards to showcase the vibrant filling. Once twisted, carefully shape the intertwined dough into a swirl or braid and transfer it to a greased 23 cm x 13 cm (9-inch x 5-inch) loaf pan, or onto a baking sheet lined with parchment paper, depending on your desired presentation.
- Second Proof. Cover the shaped loaf again with a clean towel or plastic wrap and allow it to rest in a warm place for an additional 30–40 minutes. This crucial final rise, known as the 'proof', allows the dough to relax and achieve a light, airy texture, ensuring a tender crumb once baked. The loaf should look puffy and slightly larger.
- Bake. While the loaf is performing its second proof, preheat your oven to 175°C (350°F). Once preheated and the loaf has risen, gently brush the entire surface of the dough with the beaten large egg (egg wash). This egg wash will give the bread a beautiful golden-brown, glossy finish. If desired, sprinkle a bit more fresh herbs or shredded cheese on top for extra flavor and visual appeal. Carefully place the loaf into the preheated oven and bake for 30–35 minutes, or until the top is a deep golden brown and a skewer or toothpick inserted into the center of the bread comes out clean, indicating it is fully cooked through.
- Cool and Serve. Once baked, remove the bread from the oven. Let it cool in the loaf pan for approximately 10 minutes. This allows the internal structure of the bread to stabilize and the melted cheese to set slightly, preventing it from oozing excessively when sliced. After 10 minutes, carefully transfer the loaf to a wire cooling rack to cool completely. While tempting to slice immediately, allowing it to cool slightly before cutting ensures the cheese maintains its integrity and preserves the beautiful swirl. Slice and serve warm, perhaps with a side of marinara or as an accompaniment to a hearty meal.

Tools You’ll Need
- Stand mixer with dough hook (or large mixing bowl for hand kneading)
- Measuring cups and spoons
- Large mixing bowls
- Rolling pin
- Sharp knife or bench scraper
- Loaf pan (23 cm x 13 cm / 9×5 inch) or baking sheet
- Parchment paper (if using baking sheet)
- Pastry brush
- Wire cooling rack
Essential Success Tips
- Ensure your milk is at the correct temperature (around 40°C/105°F) to activate the yeast effectively; too hot will kill it, too cold will prevent activation.
- Do not skip the kneading step; proper gluten development is paramount for a chewy, elastic bread with good structure.
- When rolling the dough into a log for the swirl, aim for a tight roll to achieve distinct and beautiful layers in the final loaf.
- Allow the dough ample time for both proofing stages; patience in rising yields a lighter, more flavorful, and tender bread.
- Adjust baking time slightly based on your specific oven's calibration and the material of your loaf pan; a deep golden brown color and a clean skewer are key indicators of doneness.
Professional Cooking Secrets
- For an even deeper and sweeter garlic flavor, consider using roasted garlic instead of minced raw garlic in the filling. Simply roast whole cloves in olive oil until tender and easily mashable before incorporating.
- To achieve a more professional, crisp crust, place a shallow pan of hot water on the bottom rack of your oven during the first 10-15 minutes of baking. The steam created helps the crust develop beautifully.
- Elevate the filling by experimenting with different cheese blends like smoked provolone, Gruyere, or a touch of Asiago. A tiny pinch of red pepper flakes can also add a subtle, warming kick.

Notes
- Storage: Store leftover Swirled Garlic Herb and Cheese Bread tightly wrapped at room temperature for up to 2-3 days. For longer storage, slice the bread and freeze in an airtight container or freezer bag for up to one month. Reheat gently in a warm oven for best results.
- Variations: Feel free to customize the filling! Try adding finely chopped sun-dried tomatoes, a sprinkle of finely diced olives, or a touch of smoked paprika for a different flavor profile. Italian seasoning can be used if fresh herbs are unavailable.
Frequently Asked Questions
Can I make this bread without a stand mixer?
Yes, absolutely! While a stand mixer simplifies the process, you can knead the dough by hand on a lightly floured surface for about 10-12 minutes until it is smooth, elastic, and passes the windowpane test (stretching a small piece thin enough to see light through it without tearing).
How do I know if my yeast is active and working?
After combining the warm milk, sugar, and yeast, the mixture should become visibly foamy and bubbly within 5-10 minutes. This foam indicates that the yeast is alive and active. If no foam appears, your yeast might be old or the milk temperature was too hot or too cold, and it's best to start over with new yeast to ensure a proper rise.
Can I prepare the dough ahead of time?
Yes, the dough can be prepared in advance. After the first proof, gently punch down the dough, place it in a lightly greased bowl, cover it tightly with plastic wrap, and refrigerate it overnight (up to 24 hours). When ready to use, remove the dough from the refrigerator and let it come to room temperature for about 30 minutes before rolling and shaping as per the instructions.
Nutrition Facts (Per Serving)
Per slice (estimated, 10 slices per loaf): Calories: 437, Protein: 10g, Fat: 17.5g, Carbohydrates: 37.5g, Sodium: 350mg.
Allergy Information
This recipe contains common allergens including wheat (gluten), dairy (milk, butter, cheese), and eggs. For a gluten-free version, a gluten-free bread flour blend would be required, and for a dairy-free version, use plant-based milk and butter substitutes, along with vegan cheese alternatives.


No comment