
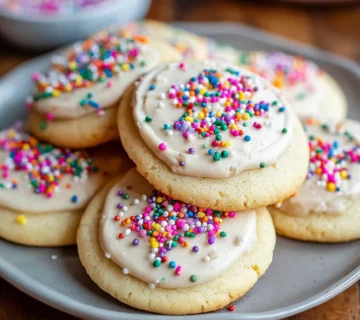
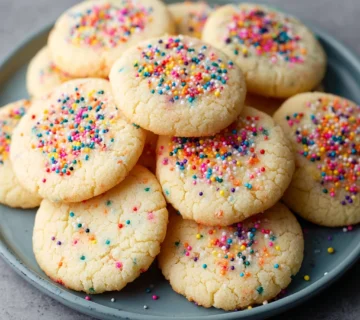
Easy Classic Sugar Cookies
Discover the timeless delight of these Easy Classic Sugar Cookies, a recipe perfected for both novice and experienced bakers alike. With a soft, chewy center and lightly crisp edges, these cookies offer a delicate sweetness that's simply irresistible. They are the perfect canvas for decorating or enjoying plain with a cup of tea or coffee.
Prep Time
20 minutes
Cook Time
10-15 minutes
Total Time
45-50 minutes (including cooling)
Servings
Makes approximately 24-30 cookies
Keywords

Why This Recipe Delivers
- Delivers a consistently soft and chewy texture with perfectly crisp edges.
- Features a rich, buttery flavor enhanced by vanilla, making it a crowd-pleaser.
- Uses simple, pantry-staple ingredients for effortless preparation.
- Incredibly versatile for decorating or enjoying plain with its subtle sweetness.
- A quick and satisfying bake, ideal for last-minute treats or gatherings.
Ingredients
- 300 grams (2 ½ cups) all-purpose flour
- 3.75 grams (¾ teaspoon) baking soda
- 5 grams (1 teaspoon) baking powder
- 226 grams (1 cup, 2 sticks) salted butter, softened to room temperature
- 250 grams (1 ¼ cups) granulated sugar
- 3 large egg yolks
- 5 ml (1 teaspoon) vanilla extract
- 50 grams (¼ cup) granulated sugar, for rolling
Instructions
- Preheat your oven to 175°C (350°F). Prepare two large baking sheets by lining them with parchment paper or silicone baking mats. This crucial step prevents sticking and ensures even baking, making cleanup a breeze. Set these prepared sheets aside.
- In a medium-sized bowl, thoroughly whisk together the all-purpose flour, baking soda, and baking powder. Whisking ensures these dry ingredients are well combined and the leavening agents are evenly distributed, which is essential for a consistent rise in every cookie. Set this dry mixture aside for later incorporation.
- In a large mixing bowl, preferably using an electric stand mixer fitted with the paddle attachment, or a hand mixer, cream together the softened salted butter and the primary portion of granulated sugar (1 ¼ cups). Beat on medium speed for 2-3 minutes, or until the mixture becomes light, fluffy, and pale in color. This creaming process incorporates air, which contributes significantly to the cookies' tender texture.
- Scrape down the sides of the bowl to ensure all ingredients are well combined. Add the three egg yolks and the vanilla extract to the creamed butter and sugar mixture. Continue to beat on medium speed until these wet ingredients are fully incorporated and the mixture is smooth and emulsified.
- Gradually add the reserved dry flour mixture to the wet ingredients in the bowl. Mix on low speed only until the flour is just combined and no streaks of dry flour remain. It is absolutely critical not to overmix the dough at this stage, as overmixing can overdevelop the gluten, leading to tough and dense cookies rather than light and tender ones.
- Using a small cookie scoop (approximately 30ml or 2 tablespoons in volume) or an ice cream scoop, portion the dough into uniform balls. This ensures all cookies bake evenly. Roll each dough ball thoroughly in the extra 50 grams (¼ cup) of granulated sugar until fully coated. Place the sugared dough balls onto your prepared baking sheets, ensuring there is about 5 cm (2 inches) of space between each cookie to allow for proper spreading during baking.
- Bake the cookies in the preheated oven for 10 to 15 minutes. Baking times can vary based on individual ovens, so watch for the tops of the cookies to just begin cracking and the edges to turn a very light golden brown. The centers may still appear soft, but they will firm up as they cool.
- Once baked, remove the baking sheets from the oven and allow the cookies to cool on the sheets for approximately 5 minutes. This crucial resting period allows the cookies to set and become firm enough to handle without breaking.
- Carefully transfer the slightly cooled cookies from the baking sheets to a wire rack to cool completely. Cooling on a wire rack ensures air circulates around all sides of the cookies, preventing the bottoms from becoming soggy and helping them achieve that perfect, slightly chewy texture.

Tools You’ll Need
- Electric stand mixer or hand mixer
- Large mixing bowl
- Medium mixing bowl
- Whisk
- Rubber spatula
- Measuring cups and spoons (or kitchen scale)
- Small cookie scoop (2 tablespoon / 30ml)
- Two large baking sheets
- Parchment paper or silicone baking mats
- Wire cooling rack
Essential Success Tips
- Ensure your butter is truly softened to room temperature for optimal creaming. If it's too cold, it won't incorporate enough air; too warm, and the cookies might spread too much.
- Do not overmix the dough once the flour is added. Mixing just until combined prevents gluten development, which keeps your cookies tender.
- Use a cookie scoop for uniform cookie sizes, which ensures even baking across the batch. Consistency is key!
- Keep an eye on the cookies as they bake; ovens vary. Look for cracked tops and lightly golden edges as your cue for doneness, rather than strict timing.
- Allow cookies to cool on the baking sheet for a few minutes before transferring them to a wire rack. This allows them to firm up and prevents breakage.
Professional Cooking Secrets
- For an extra layer of flavor, consider using brown butter. Simply brown the butter first, let it cool and solidify slightly in the fridge, then use it as 'softened butter' in the recipe for a nutty depth.
- To achieve perfectly round cookies, immediately after removing them from the oven, use a large circular cookie cutter or the rim of a glass slightly larger than the cookie to gently 'scoot' the warm cookies into shape. This reshapes any uneven edges while they're still pliable.
- Chill your cookie dough for at least 30 minutes (or up to 2 days) before scooping and baking. This helps to deepen the flavors, reduces spreading, and results in a chewier cookie.

Notes
- Storage: Store cooled cookies in an airtight container at room temperature for up to 5-7 days. Dough can be made ahead and refrigerated for up to 2 days, or frozen for up to 3 months. If freezing dough, thaw in the refrigerator overnight before baking.
- Variations: Feel free to add a pinch of nutmeg or cardamom to the dry ingredients for a spiced twist. For a zestier cookie, add 1 tablespoon of lemon or orange zest to the butter and sugar mixture during the creaming step.
Frequently Asked Questions
Can I use unsalted butter instead of salted?
Yes, you can use unsalted butter. If you do, we recommend adding an extra ¼ teaspoon (1.25 grams) of fine salt to the dry ingredients to balance the flavors.
Why did my cookies spread too much?
Cookies spreading too much can be due to several factors: your butter might have been too warm, the dough wasn't chilled, or your oven temperature might be slightly off (too low). Ensure ingredients are at the correct temperature and avoid overmixing the dough.
Can I decorate these cookies with royal icing?
Absolutely! These cookies hold their shape well and have a smooth surface once cooled, making them an excellent base for royal icing, glazes, or simple sprinkles. Just ensure they are completely cool before decorating.
Nutrition Facts (Per Serving)
Per cookie (estimated): Calories: 180-200, Protein: 2g, Fat: 10-12g, Saturated Fat: 6-7g, Carbohydrates: 22-25g, Sugar: 15-18g, Sodium: 80-100mg.
Allergy Information
Contains wheat, dairy (butter), and eggs. Always check individual ingredient labels for specific allergen information. This recipe is not suitable for gluten-free or vegan diets without modifications.

No comment