
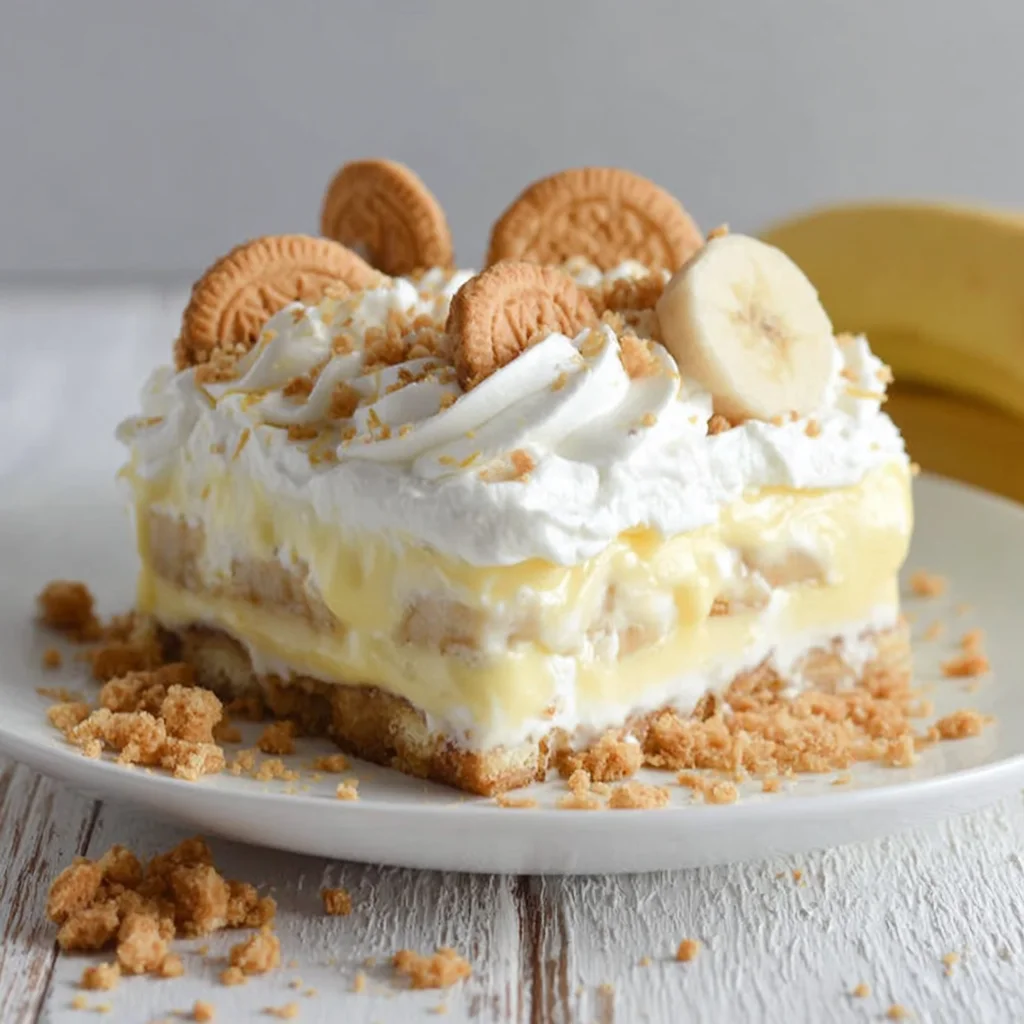
Banana Pudding Dream Bars
Indulge in the ultimate no-bake dessert with these Banana Pudding Dream Bars, a heavenly layered treat that combines the nostalgic flavors of classic banana pudding with a creamy cheesecake twist. Featuring a golden Oreo crust, a luscious banana-infused cream cheese layer, smooth banana pudding, and a generous topping of whipped cream and crushed Oreos, these bars are pure bliss. They're effortlessly elegant and perfect for any gathering, promising a delightful spoonful of comfort in every bite.
Prep Time
60 minutes
Cook Time
0 minutes
Total Time
3 hours (including chilling)
Servings
9-12 servings
Keywords

Why This Recipe Delivers
- Effortlessly elegant and requires absolutely no baking, making it perfect for any occasion.
- Combines multiple beloved dessert elements—Oreo crust, creamy cheesecake, and classic banana pudding—into one irresistible bar.
- Features a delightful crunch and rich flavor from the Golden Oreo crust, contrasting beautifully with the smooth layers.
- Perfect for entertaining guests or simply indulging in a comforting weeknight treat.
- Can be made ahead of time, simplifying your party preparations or meal planning.
Ingredients
- 28 Golden Oreo cookies with filling, divided (approximately 350 grams)
- 56 grams (4 tablespoons) unsalted butter, melted
- 3 ripe but firm medium bananas, divided
- 113 grams (4 ounces) cream cheese, at room temperature
- 60 grams (1/2 cup) confectioners’ sugar
- 5 milliliters (1 teaspoon) pure vanilla extract
- 225 grams (8 ounces) Cool Whip, divided, or 1 recipe of stabilized whipped cream
- 110 grams (3.9 ounce) package instant banana pudding mix
- 360 milliliters (1 1/2 cups) cold milk (preferably whole milk)
Instructions
- Prepare the Oreo crust by finely crushing 20 of the Golden Oreo cookies in a blender or food processor until they resemble fine crumbs. Ensure there are no large pieces remaining for a consistent crust.
- Melt the butter by placing it in a medium microwave-safe bowl and heating for about 30 seconds, or until fully liquid. Once melted, add the crushed Oreo crumbs to the butter and mix thoroughly until all crumbs are moistened.
- Press the buttered cookie crumbs evenly into the bottom of an ungreased 20×20 cm (8×8-inch) baking dish. Use the back of a spoon or your knuckles to create a firm, compact crust. Place the dish into the freezer to chill and set for at least 30 minutes.
- While the crust chills, prepare the banana pudding layer. In a small bowl, whisk together the instant banana pudding mix and 360 ml (1 1/2 cups) cold milk for about 2 minutes, until the mixture begins to thicken. Refrigerate this while you prepare the next layer.
- Begin the banana cheesecake layer by mashing one of the bananas in a separate mixing bowl until smooth. A fork works well for this, leaving a few small lumps for texture if desired.
- Add the room temperature cream cheese to the mashed banana. Using an electric mixer, cream these two ingredients together until smooth and well combined. This ensures a lump-free cheesecake layer.
- Add the confectioners’ sugar and pure vanilla extract to the cream cheese mixture. Continue mixing with the electric mixer until thoroughly blended and creamy.
- Gently fold in 120 grams (1 cup) of the Cool Whip (or stabilized whipped cream) into the cream cheese mixture. Use a rubber spatula for this step, carefully mixing until just combined to maintain the airy texture of the whipped cream.
- Retrieve the chilled crust from the freezer. Slice the two remaining bananas into thin rounds and arrange them in an even layer over the cooled Oreo crust.
- Carefully place dollops of the banana cream cheese mixture over the sliced bananas. Using an offset spatula or the back of a spoon, gently spread the mixture to completely cover the bananas, being careful not to disturb the crust.
- Evenly spread the prepared banana pudding over the cream cheese layer, creating a smooth and delicious middle layer for the bars.
- Top the entire dish with the remaining 105 grams (approximately 1/2 cup) of Cool Whip, spreading it gently to cover the pudding layer.
- Thirteenth Step: Refrigerate the Banana Pudding Dream Bars for at least two hours to allow all the layers to set properly, ensuring clean slices when serving. For best results, chill overnight.
- Fourteenth Step: Just before serving, place the remaining 8 Golden Oreo cookies into a plastic bag and crush them into coarse crumbs using a rolling pin or by hand. Sprinkle these crushed cookies evenly over the top of the bars for an appealing finish and extra crunch.
Tools You’ll Need
- 20×20 cm (8×8-inch) baking dish
- Blender or food processor
- Microwave-safe bowl
- Mixing bowls (small, medium, large)
- Electric mixer (handheld or stand mixer)
- Rubber spatula or whisk
- Offset spatula or spoon
- Measuring cups and spoons
- Plastic bag (for crushing Oreos)
Essential Success Tips
- Ensure your cream cheese is at room temperature for at least 30 minutes before mixing. This is crucial for achieving a smooth, lump-free cheesecake layer that incorporates seamlessly with other ingredients.
- Select ripe but firm bananas for slicing and mashing. Overripe bananas can release too much moisture, potentially making your bars watery, while underripe bananas lack sweetness and flavor.
- Thoroughly chill the Oreo crust in the freezer for the recommended 30 minutes. A well-chilled crust will be firm and less prone to crumbling when you add the subsequent layers.
- When folding the Cool Whip into the cheesecake mixture, do so gently and avoid overmixing. This preserves the airy texture of the whipped cream, contributing to a lighter, more delicate final product.
- Allow the bars to chill for a minimum of two hours, or preferably longer, before serving. This crucial step allows all the layers to properly set and meld, ensuring clean, perfect slices and optimal flavor development.
Professional Cooking Secrets
- For an extra layer of depth and flavor in your crust, lightly toast the pressed Oreo crust in a preheated oven at 175°C (350°F) for 5-7 minutes after pressing it into the pan, then chill completely. This enhances the cookie flavor and adds a subtle roasted note.
- To prevent any potential browning of the banana slices, particularly if preparing the bars several hours in advance, you can lightly brush them with a tiny amount of lemon juice. The acidity helps preserve their color, although the quick assembly and chilling usually suffice.
- For a truly gourmet touch, consider making your own stabilized whipped cream instead of using Cool Whip. Combine cold heavy cream with a touch of confectioners' sugar and a small amount of gelatin or cream of tartar; it offers superior flavor and holds its shape beautifully for days.

Notes
- Storage: Store any leftover Banana Pudding Dream Bars in an airtight container in the refrigerator for up to 3-4 days. While the bananas may begin to brown slightly over time, the bars will still be delicious.
- Variations: Feel free to experiment with different cookie crusts; vanilla wafers or graham crackers make excellent alternatives. For an extra touch of indulgence, a drizzle of caramel or white chocolate sauce over the top before serving can elevate the flavors.
Frequently Asked Questions
Can I use fresh whipped cream instead of Cool Whip?
Yes, absolutely! For a richer, more natural flavor and texture, you can make your own stabilized whipped cream. Ensure it's stabilized (e.g., with a touch of gelatin or cream of tartar) so it holds its shape well over time and doesn't weep.
How far in advance can I make these bars?
These bars are at their peak flavor and texture within 24-48 hours of preparation. While they can be made up to 3-4 days in advance, the bananas might start to brown or soften more significantly, and the crust could become less crisp after the first day.
Can I make these in a different sized pan?
Yes, you can adjust the pan size. For a 23×33 cm (9×13 inch) pan, you would likely need to double the entire recipe to achieve similar layer thickness. Always remember to adjust the chilling times as necessary, as a thinner or thicker dessert may set differently.
Nutrition Facts (Per Serving)
Calories: approximately 400 per serving, Protein: 6g, Fat: 25g, Carbohydrates: 45g (Note: Nutritional values are estimates and can vary based on specific brands and exact ingredient quantities.)
Allergy Information
This dish contains common allergens including dairy (from milk, cream cheese, and Cool Whip), gluten (from Oreo cookies), and potentially soy (present in some instant pudding mixes and Cool Whip products). For a gluten-free alternative, replace the Golden Oreos with a certified gluten-free vanilla sandwich cookie.


No comment